X2000 Ethernet
1 功能简介
x2000 支持两个以太网接口,只有一个phy_clk.。
双千兆网卡rgmii使用场景,两个phy的clk必须相同,否则只能一个接phy_clk 一个接晶振。
一个千兆rgmii一个百兆rmii,phy的clk不相同的情况下,rgmii使用phy_clk rmii使用tx_clk 作为时钟源
虚拟phy设备,用于rgmii直接通讯,没有mdio引脚,需要用户根据自己的需求修改代码里面的virtual_rgmii_phy_reg数组。
注意:rgmii走线要求,rx0-rx3 需要等长,tx0-tx3需要等长 !!!
rx_clk 与 rx_data 等长的情况下,并且phy没有配置rx_delay, x2000的rx_delay 配置为默认值60
tx_clk 与 tx_data 等长的情况下,并且phy没有配置tx_delay, x2000的tx_delay 配置为默认值60
如��果 tx_clk 与 tx_data 不等长,或 rx_clk 与 rx_data 不等长,需要用iperf3测试出最合适值。
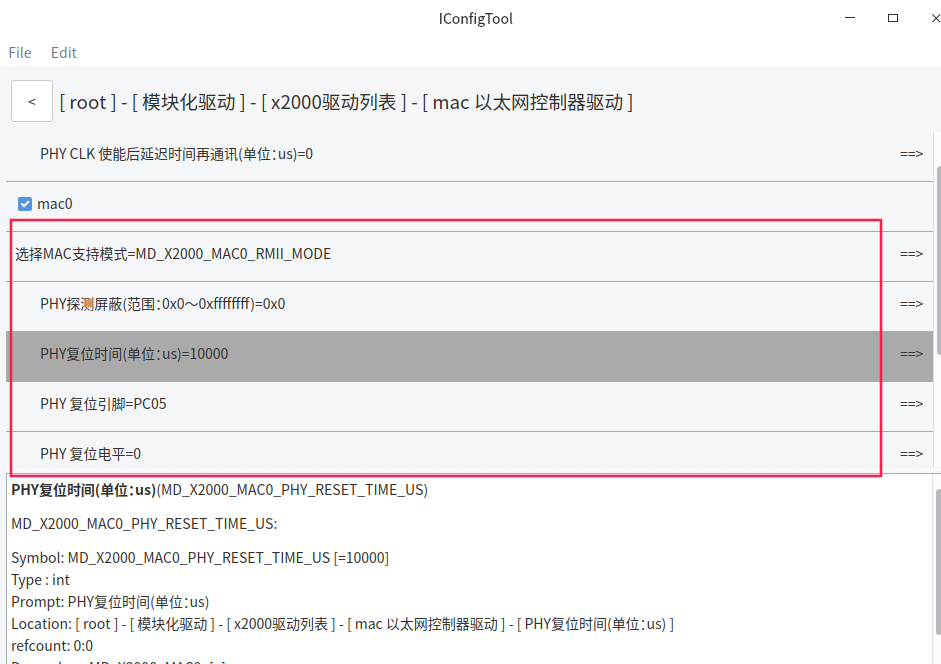
2 驱动配置
进入iconfig配置以太网驱动
3 基础验证
3.1 查看网络设备节点
# ifconfig -a
eth0      Link encap:Ethernet  HWaddr 12:7F:5B:25:4C:4C                  //以太网设备节点一般是ethX命名的
          inet addr:10.4.3.6  Bcast:10.4.3.255  Mask:255.255.255.0
          BROADCAST MULTICAST  MTU:1500  Metric:1
          RX packets:11 errors:0 dropped:0 overruns:0 frame:0
          TX packets:13 errors:0 dropped:0 overruns:0 carrier:0
          collisions:0 txqueuelen:1000
          RX bytes:1040 (1.0 KiB)  TX bytes:1106 (1.0 KiB)
          Interrupt:63

lo        Link encap:Local Loopback
          inet addr:127.0.0.1  Mask:255.0.0.0
          UP LOOPBACK RUNNING  MTU:65536  Metric:1
          RX packets:8 errors:0 dropped:0 overruns:0 frame:0
          TX packets:8 errors:0 dropped:0 overruns:0 carrier:0
          collisions:0 txqueuelen:1
          RX bytes:584 (584.0 B)  TX bytes:584 (584.0 B)

wlan0     Link encap:Ethernet  HWaddr D0:31:10:CF:F3:24
          BROADCAST MULTICAST  MTU:1500  Metric:1
          RX packets:0 errors:0 dropped:3 overruns:0 frame:0
          TX packets:1413 errors:0 dropped:0 overruns:0 carrier:0
          collisions:0 txqueuelen:1000
          RX bytes:0 (0.0 B)  TX bytes:483246 (471.9 KiB)
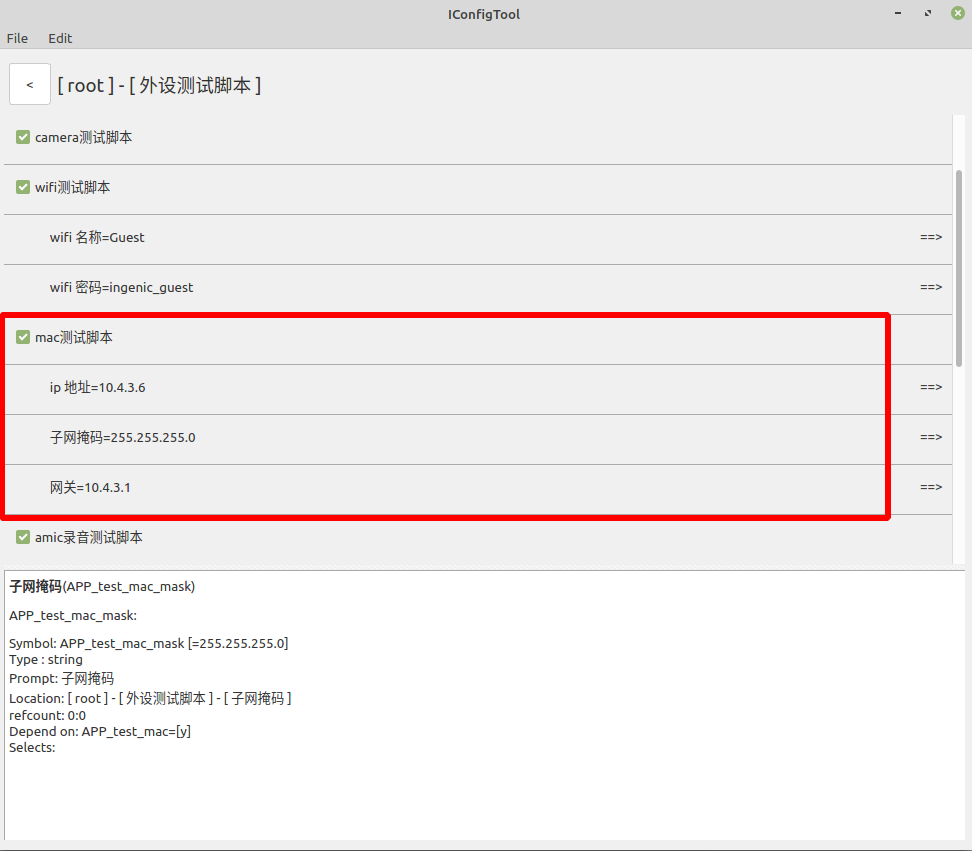
3.2 配置ip地址及子网掩码
配置格式为
ifconfig [⽹络设备] [ip地址] netmask [⼦⽹掩码] up
# ifconfig eth0 10.4.3.202 netmask 255.255.255.0 up

# [  638.103441] eth0: device MAC address 4a:9e:6d:a6:60:79

# [  640.100211] stmmaceth stmmaceth.0 eth0: Link is Up - 100Mbps/Full - flow control off
# ifconfig                                                   //查看网络配置是否生效
eth0      Link encap:Ethernet  HWaddr 12:7F:5B:25:4C:4C
          inet addr:10.4.3.202  Bcast:10.4.3.255  Mask:255.255.255.0
          UP BROADCAST RUNNING MULTICAST  MTU:1500  Metric:1
          RX packets:11 errors:0 dropped:0 overruns:0 frame:0
          TX packets:13 errors:0 dropped:0 overruns:0 carrier:0
          collisions:0 txqueuelen:1000
          RX bytes:1040 (1.0 KiB)  TX bytes:1106 (1.0 KiB)
          Interrupt:63

lo        Link encap:Local Loopback
          inet addr:127.0.0.1  Mask:255.0.0.0
          UP LOOPBACK RUNNING  MTU:65536  Metric:1
          RX packets:8 errors:0 dropped:0 overruns:0 frame:0
          TX packets:8 errors:0 dropped:0 overruns:0 carrier:0
          collisions:0 txqueuelen:1
          RX bytes:584 (584.0 B)  TX bytes:584 (584.0 B)
3.3 配置网关地址
配置格式为
route add default gw [⽹关]
# route add default gw 10.4.3.1
3.4 ping 百度测试
开发板已经默认添加了域名解析,可以不用自己添加
# cat /tmp/resolv.conf
nameserver 202.96.134.133 # wlan0
nameserver 8.8.8.8 # wlan0
# ping www.baidu.com
PING www.baidu.com (14.215.177.38): 56 data bytes
64 bytes from 14.215.177.38: seq=0 ttl=55 time=7.632 ms
64 bytes from 14.215.177.38: seq=1 ttl=55 time=7.666 ms
64 bytes from 14.215.177.38: seq=2 ttl=55 time=7.565 ms
64 bytes from 14.215.177.38: seq=3 ttl=55 time=7.618 ms
64 bytes from 14.215.177.38: seq=4 ttl=55 time=7.779 ms
^C
--- www.baidu.com ping statistics ---
5 packets transmitted, 5 packets received, 0% packet loss
round-trip min/avg/max = 7.565/7.652/7.779 ms
3.5 关闭网络设备
# ifconfig eth0 down
# ifconfig

lo        Link encap:Local Loopback
          inet addr:127.0.0.1  Mask:255.0.0.0
          UP LOOPBACK RUNNING  MTU:65536  Metric:1
          RX packets:17 errors:0 dropped:0 overruns:0 frame:0
          TX packets:17 errors:0 dropped:0 overruns:0 carrier:0
          collisions:0 txqueuelen:1
          RX bytes:1444 (1.4 KiB)  TX bytes:1444 (1.4 KiB)

wlan0     Link encap:Ethernet  HWaddr D0:31:10:85:43:27
          inet addr:12.10.70.36  Bcast:12.10.70.255  Mask:255.255.255.0
          UP BROADCAST RUNNING MULTICAST  MTU:1500  Metric:1
          RX packets:1704 errors:0 dropped:455 overruns:0 frame:0
          TX packets:8 errors:0 dropped:0 overruns:0 carrier:0
          collisions:0 txqueuelen:1000
          RX bytes:142987 (139.6 KiB)  TX bytes:1400 (1.3 KiB)
4 gmac 千兆网应用
rgmii走线要求,rx0-rx3 需要等长,tx0-tx3需要等长 !!! rx_clk 与 rx_data 等长的情况下,并且phy没有配置rx_delay, x2000的rx_delay 配置为默认值60
tx_clk 与 tx_data 等长的情况下,并且phy没有配置tx_delay, x2000的tx_delay 配置为默认值60
如果 tx_clk 与 tx_data 不等长,或 rx_clk 与 rx_data 不等长,需要用iperf3测试出最合适值。具体方法如下:
4.1 确定tx_delay 和 rx_delay 最佳的delay值
4.1.1 确认能ping通的数值范围
mac_ping_test.sh 脚本内容如下
#!/bin/sh

#mac_ping_test.sh

i=0
while [ $i -le 128 ]
do
        sh soc_mac_driver.sh $i
        ifconfig eth0 10.4.3.110 up		#ip 地址根据实际情况修改
        sleep 5
        echo i = $i
        ping 10.4.3.100 -w 4				#目标ip 地址根据实际情况修改
        echo $i $? >> test.log
        ifconfig eth0 down
        rmmod soc_mac_driver
        let i++
done
确定tx_delay 和 rx_delay 最佳delay值的操作步骤:
ifconfig eth0 down //关闭网卡
rmmod soc_mac_driver //卸载驱动
cp /module_driver/soc_mac_driver.ko /usr/data/ //把��驱动和脚本拷贝到可修改的文件系统
cp /module_driver/soc_mac_driver.sh /usr/data/
cd /usr/data //进入到可修改文件系统的目录
vi soc_mac_driver.sh //修改驱动脚本
把需要测试的delay修改成 $1 输入参数
mac0_tx_clk_delay=60 ==> mac0_tx_clk_delay=$1
或或或 mac0_rx_clk_delay=60 ==> mac0_rx_clk_delay=$1 //注意:一次只测试一个参数,txdelay和rxdelay需要分开测试。
./mac_ping_test.sh //执行测试脚本
注意:ip地址和目标ip地址需要根据实际情况修改
cat test.log
查看能ping通的delay参数的范围,从而确定tx_delay 和 rx_delay 最佳的delay值
4.1.2 进一步确定最佳数值
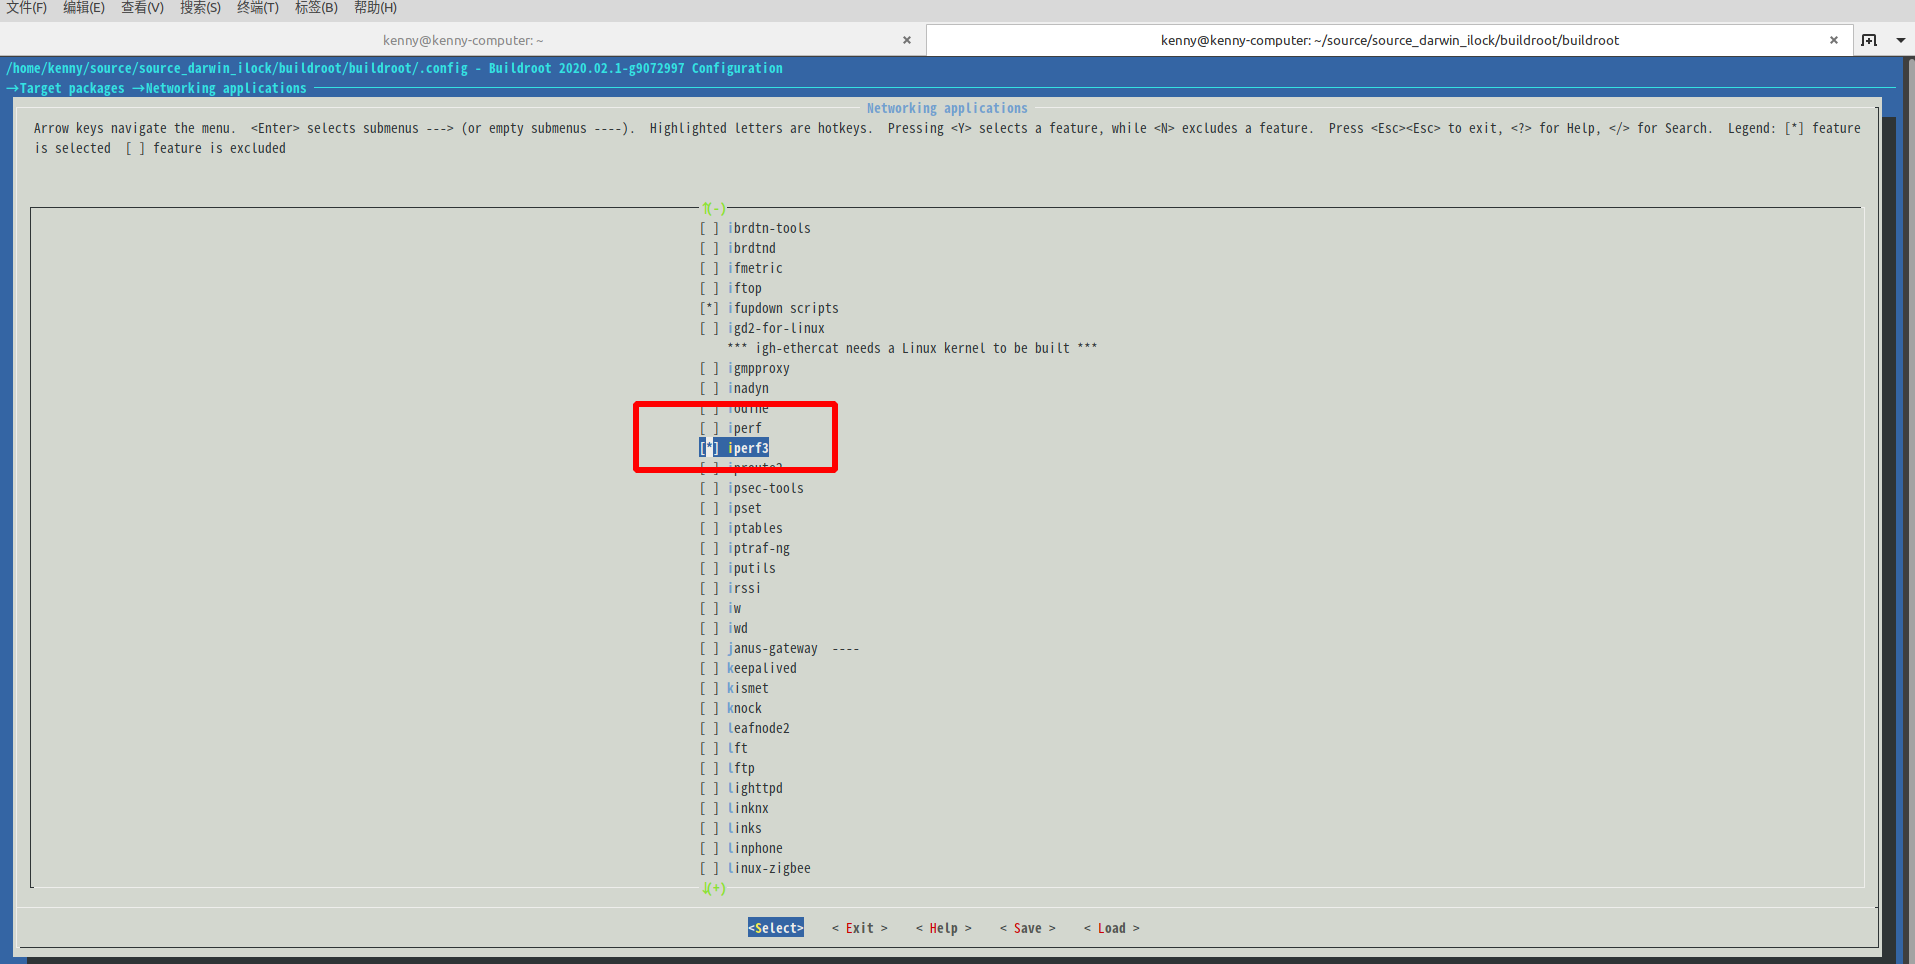
设备端iperf 网络测试工具安装
buildroot/buildroot$ make menuconfig
配置 iperf
kenny@kenny-computer:~/source/source_darwin_ilock/build$ grep -nr "buildroot" configs/x2000_darwin_factory_defconfig
8:APP_br_dir=../buildroot/buildroot
9:APP_br_config_file=configs/buildroot/buildroot_x2000_darwin_debug
456:# APP_br_root_login_keep_buildroot is not set
因此当前buildroot的配置为 buildroot_x2000_darwin_debug
选上以后,保存退出。然后执行如下操作。
buildroot/buildroot$ cp .config ../../build/configs/buildroot/buildroot_x2000_darwin_debug
重新编译buildroot,然后打包重新烧录固件。
build$ make x2000_darwin_factory_defconfig
build$ make
重新烧录,请参考: 烧录方法
在设备端运行之前,目标IP端运行如�下命令,我这里使用的是我的电脑。
目标ip(10.4.3.5) 端运行如下:

kenny@kenny-computer:~$ iperf3 -s
-----------------------------------------------------------

Server listening on 5201
-----------------------------------------------------------

Accepted connection from 10.4.3.202, port 36838
[  5] local 10.4.3.5 port 5201 connected to 10.4.3.202 port 36840
[ ID] Interval           Transfer     Bitrate
[  5]   0.00-1.00   sec  10.9 MBytes  91.6 Mbits/sec
[  5]   1.00-2.00   sec  11.2 MBytes  93.9 Mbits/sec
[  5]   2.00-3.00   sec  11.2 MBytes  94.1 Mbits/sec
[  5]   3.00-4.00   sec  11.2 MBytes  93.9 Mbits/sec
[  5]   4.00-5.00   sec  11.2 MBytes  94.0 Mbits/sec
[  5]   5.00-6.00   sec  11.2 MBytes  94.1 Mbits/sec
[  5]   6.00-7.00   sec  11.2 MBytes  94.1 Mbits/sec
[  5]   7.00-8.00   sec  11.2 MBytes  94.0 Mbits/sec
[  5]   8.00-9.00   sec  11.2 MBytes  93.9 Mbits/sec
[  5]   9.00-10.00  sec  11.2 MBytes  94.1 Mbits/sec
[  5]  10.00-10.04  sec   477 KBytes  93.9 Mbits/sec

- - - - - - - - - - - - - - - - - - - - - - - - -

[ ID] Interval           Transfer     Bitrate

[  5]   0.00-10.04  sec   112 MBytes  93.8 Mbits/sec                  receiver
-----------------------------------------------------------

Server listening on 5201
系统起来以后,设备端执行:


ifconfig eth0 down  //关闭网卡

rmmod soc_mac_driver  //卸载驱动

cp /module_driver/soc_mac_driver.ko /usr/data/		//把驱动和脚本拷贝到可修改的文件系统
cp /module_driver/soc_mac_driver.sh /usr/data/

cd /usr/data	//进入到可修改文件系统的目录
vi soc_mac_driver.sh  //修改驱动脚本
	把需要测试的delay修改成 $1   输入参数
	mac0_tx_clk_delay=60  ==>  mac0_tx_clk_delay=$1
	或或或 mac0_rx_clk_delay=60  ==>  mac0_rx_clk_delay=$1   //注意:一次只测试一个参数,txdelay和rxdelay需要分开测试。

./mac_iperf_test.sh 40 100
  //把能ping同的delay参数范围用iperf3测试,终端记录最佳的delay参数的速率。
  //一般iperf3测试的数据有一定的误差,可以取最佳数据范围的中间值,不一定是测试带宽结果的最大值。

//注意:ip地址和目标ip地址需要根据实际情况修改,目标ip地址需要运行iperf3服务器 (iperf3 -s)
//根据测试txdelay 或 rxdelay 修改iperf3测试脚本
//iperf3 -c 10.4.3.5     是测试tx发送
//iperf3 -c 10.4.3.5 -R  是测试rx接收
mac_iperf_test.sh 脚本内容如下:
#!/bin/sh

#mac_iperf_test.sh

i=$1
while [ $i -le $2 ]
do
        sh soc_mac_driver.sh $i
        ifconfig eth0 10.4.3.202 up		#ip 地址根据实际情况修改
        sleep 5
        echo i = $i
        iperf3 -c 10.4.3.5  #tx    -R(rx)   #目标ip 地址根据实际情况修改
        ifconfig eth0 down
        rmmod soc_mac_driver
        let i++
done
执行log如下:
# cd /usr/data/

# ./mac_iperf_test.sh 40 100

insmod: can't insert 'soc_mac_driver.ko': File exists
i = 40
Connecting to host 10.4.3.5, port 5201
[  5] local 10.4.3.202 port 36840 connected to 10.4.3.5 port 5201
[ ID] Interval           Transfer     Bitrate         Retr  Cwnd
[  5]   0.00-1.00   sec  11.5 MBytes  96.1 Mbits/sec    1    117 KBytes
[  5]   1.00-2.00   sec  11.2 MBytes  94.4 Mbits/sec    0    117 KBytes
[  5]   2.00-3.00   sec  11.3 MBytes  94.9 Mbits/sec    0    127 KBytes
[  5]   3.00-4.00   sec  11.2 MBytes  93.8 Mbits/sec    0    148 KBytes
[  5]   4.00-5.00   sec  11.2 MBytes  93.8 Mbits/sec    0    167 KBytes
[  5]   5.00-6.00   sec  11.2 MBytes  93.8 Mbits/sec    0    175 KBytes
[  5]   6.00-7.00   sec  11.2 MBytes  94.4 Mbits/sec    0    184 KBytes
[  5]   7.00-8.00   sec  11.5 MBytes  96.4 Mbits/sec    0    233 KBytes
[  5]   8.00-9.00   sec  11.2 MBytes  93.8 Mbits/sec    0    233 KBytes
[  5]   9.00-10.00  sec  11.2 MBytes  93.8 Mbits/sec    0    233 KBytes

- - - - - - - - - - - - - - - - - - - - - - - - -

[ ID] Interval           Transfer     Bitrate         Retr
[  5]   0.00-10.00  sec   113 MBytes  94.5 Mbits/sec    1             sender
[  5]   0.00-10.04  sec   112 MBytes  93.8 Mbits/sec                  receiver

iperf Done.


cat test.log
查看能ping同的delay参数的范围
4.2 双千兆使用场景优化
指定处理以太网中断函数的cpu,可以避免双网卡由于双核使用不均衡造成的性能不稳定:
echo 0 > /proc/irq/61/smp_affinity_list   /*指定cpu0处理gmac1接收的数据*/
echo 1 > /proc/irq/63/smp_affinity_list   /*指定cpu1处理gmac0接收的数据, gmac0中断号63  gmac1中断号61*/

双千兆网卡都接收的情况下,可以跑满带宽 1900M
双千兆网卡都发送的情况下,两个网卡带宽相加只能到 1200M

如果不指定cpu对应mac的中断,可能会出现一个mac跑满带宽950M,另一mac只有250M
指定中断的cpu后 双网卡同时发送两边都可以跑到500M以上
5 mac phy 寄存器调试
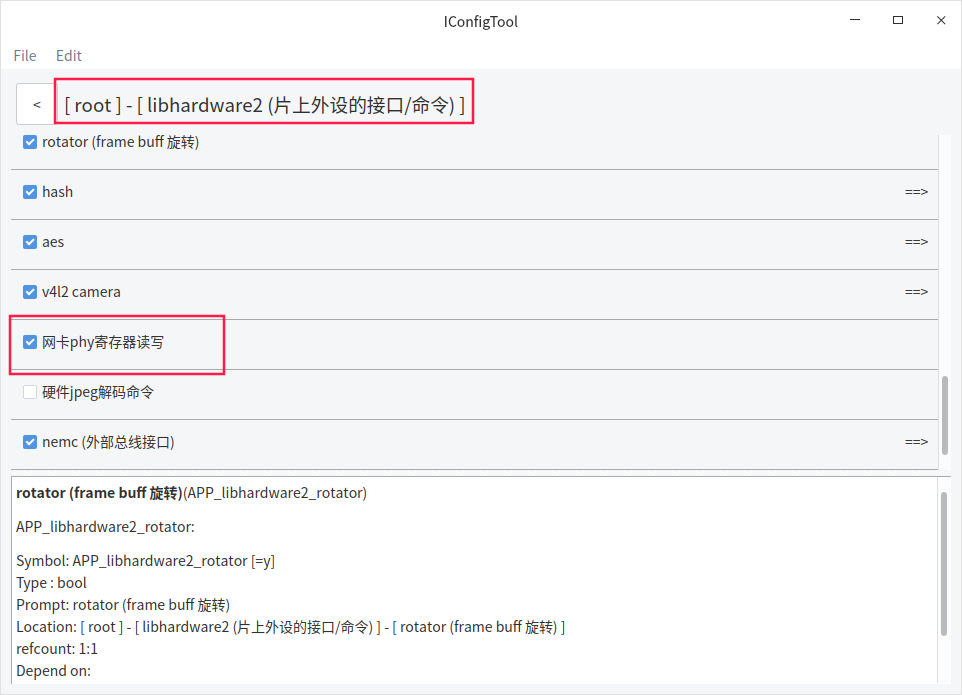
cmd_mdio
	read operation: cmd_mdio eth reg_addr
	write operation: cmd_mdio eth addr value

For example:
	cmd_mdio eth0 1   读mac_phy寄存器
	cmd_mdio eth0 0 0x12  写mac_phy寄存器