x2600e_vast快速上手文档
一 硬件介绍
x2600e_vast开发板目前有v1.0和v2.0两个硬件版本,其中v1.0采用X2600E + 4Gbit sfc nand, v2.0采用v1.0采用X2600E + 1Gbit sfc nand。
供电:Type-C插入可以烧录&供电,不需额外供电
串口输出:uart2, PD12~13, 波特率:3000000
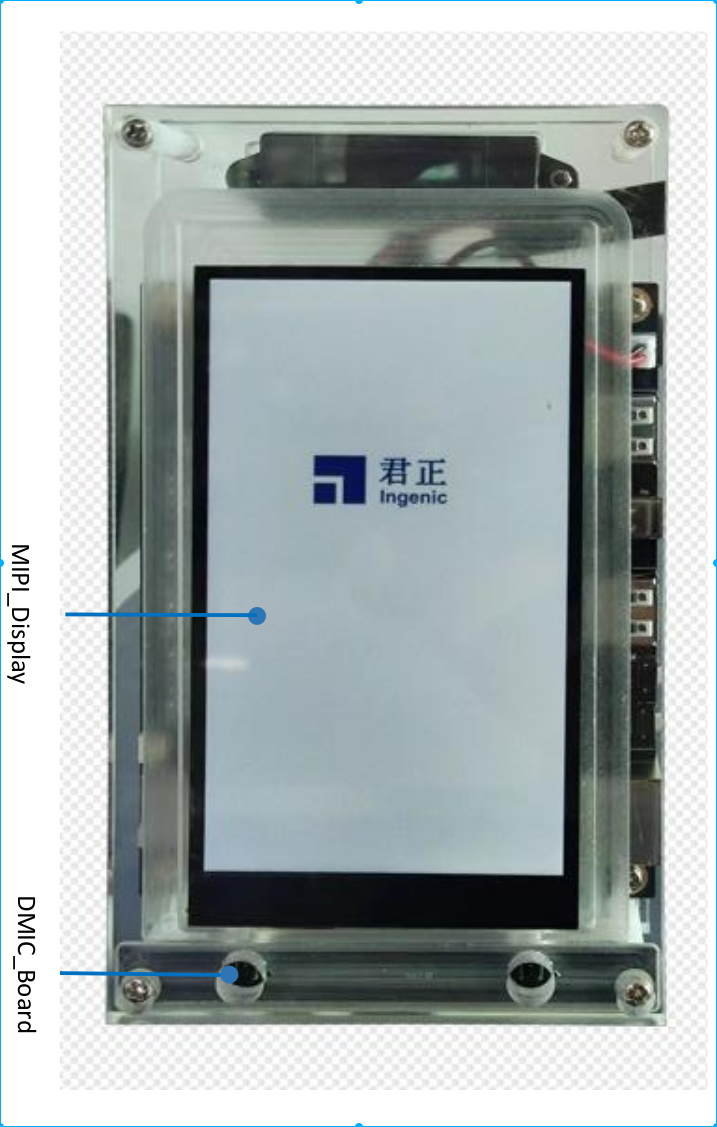
vast板的屏板图
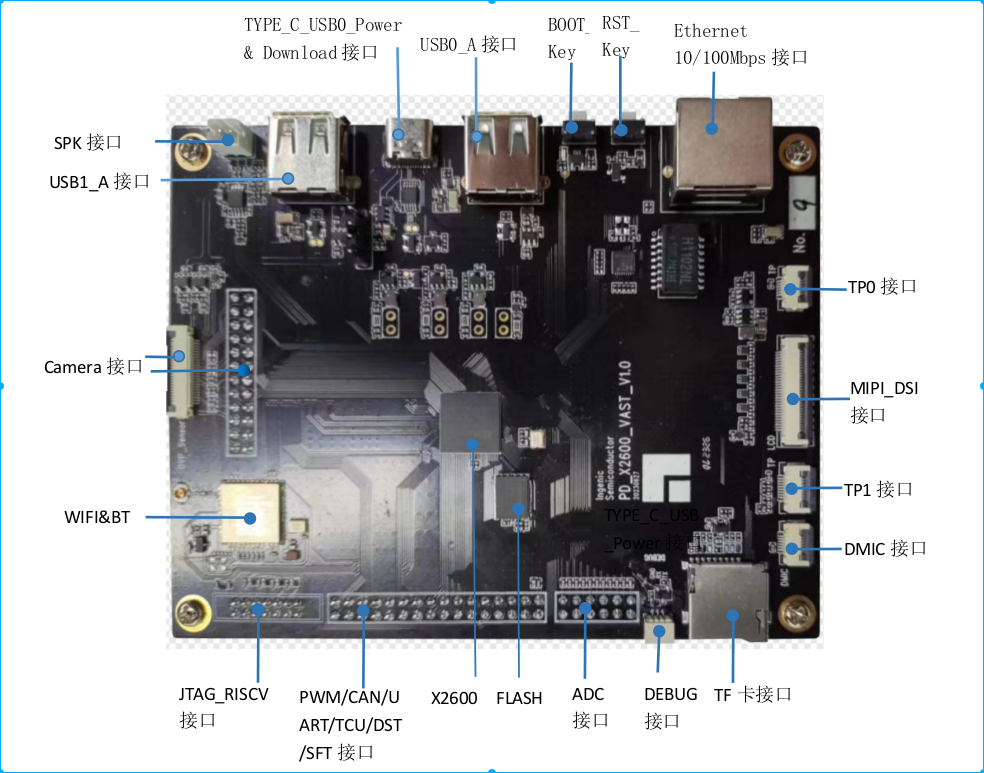
vast_v1.0的主板图
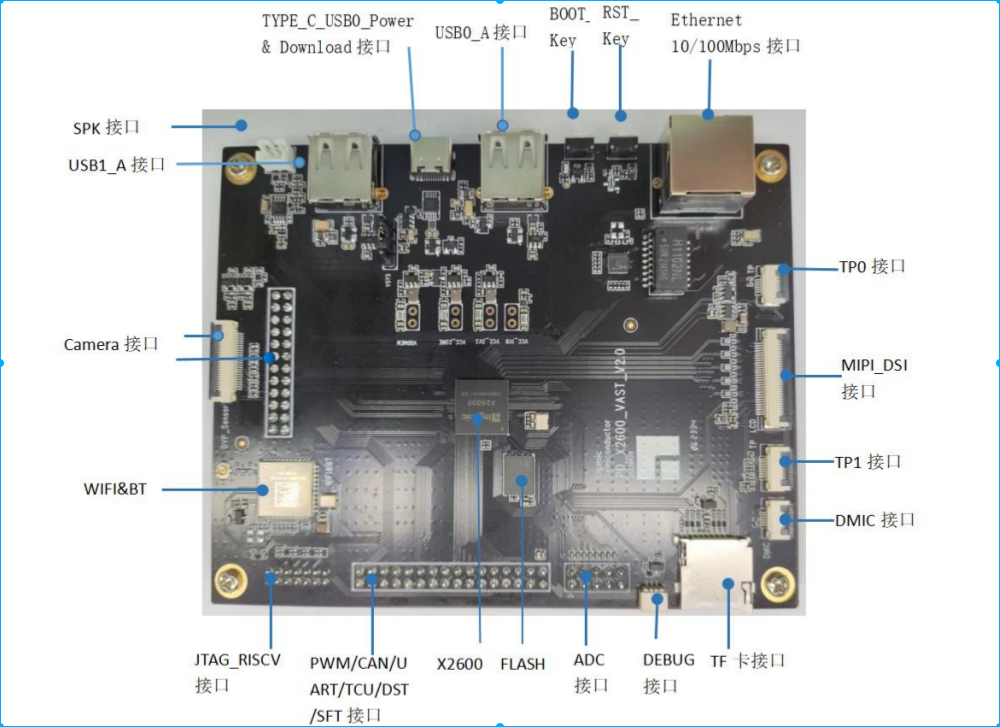
vast_v2.0的主板图
二 获取源码方法
注意: (1)推荐在 X86_64 Ubuntu 16.04 或者X86_64 Ubuntu 20.04系统环境下进行开发,不要使用X86_64 Ubuntu 20.04以上的版本,若使用其它系统版本,可能需要对编译环境做相应调整。(2)同步代码Python版本号的要求:电脑系统安装的 python 的版本要使用 Python 2.x或者3.8+,不然会导致同步代码报错。具体的python使用方法见该文档中的 repo工具下载。
(3)使用普通用户进行编译,不要使用 root 用户权限进行编译。
在获取源码之前,都需要把你开发电脑上的相应的 public key发送给我司进行添加,从而得到获取源码的权限。本地电脑获取 public key的方法如下:
如果本机还没有 ssh public key,可以通过以下方法生成, 打开一个终端输入下列命令:
jiangwen@uws:~/work/x1000/zk_external_git_test$ ssh-keygen
//输入 ssh-keygen 后,使用 默认配置,一路回车直到完成即可
jiangwen@uws:~/work/x1000/zk_external_git_test$ cat ~/.ssh/id_rsa.pub
Repo 工具下载:
本地python环境是2.x:
$ mkdir <Manhatton_Project>     //创建工程目录
$ cd <Mhatton_Project>
$ wget http://git.ingenic.com.cn:8082/bj/repo
$ chmod +x repo
本地python环境是3.8+:
$ mkdir <Manhatton_Project>      //创建工程目录
$ cd <Mhatton_Project>
$ wget -o repo http://git.ingenic.com.cn:8082/bj/repo-latest
$ mv repo-latest repo
$ chmod +x repo
同步代码的地址如下:
./repo init -u ssh://sz_halley2@119.136.25.25:29418/mirror/linux/manifest
./repo sync
注意:
1, 对于外部客户来说,这里的帐号不用修改,直接使用sz_halley2就可以。
2, 客户下载代码的目录路径要用全英文的,不要带有特殊符号的那种,不然编译可能会有问题
同步代码可能遇到的问题如下:
主要是因为系统环境,网络环境不一致导致在同步工程过程中出现的一些报错信息的解决方法。
这里的获取代码是基于Ubuntu14.04 64bit的环境进行的。
问题1:-bash: ./repo: No such file or directory
解决方法:
系统缺少repo工具或没有添加环境变量
wget http://git.ingenic.com.cn:8082/bj/repo (注:此链接的repo工具为君正修改过后放在服务器上的,也可使用谷歌提供的repo工�具)
chmod +x repo
问题2:Permission denied (publickey).
fatal: Could not read from remote repository.
解决方法:
请确认是否有权限同步代码,同步代码需提交key于我司开通权限
问题3:Their offer: diffie-hellman-group1-sha1
解决方法:
修改~/.ssh/config,加入
Host *
KexAlgorithms +diffie-hellman-group1-sha1
问题4:aes128-ctr,aes192-ctr,aes256-ctr
解决方法:
修改 /etc/ssh/ssh_config 文件
删除Ciphers aes128-ctr,aes192-ctr,aes256-ctr….行前注释符号
问题5:git config --global user.name "yourname"
git config --global user.email your@email.com
解决方法:
若不需要提交代码至服务器可直接跳过执行后续步骤
若需要提交代码请根据提示命令注册姓名及邮箱地址
git config --global user.name "your name"
git config --global user.email "you email"
问题6:Traceback (most recent call last):File "/home/jdai/work/test1/.repo/repo/main.py", line 385, in
_Main(sys.argv[1:])
File "/home/jdai/work/test1/.repo/repo/main.py", line 365, in _Main
result = repo._Run(argv) or 0
File "/home/jdai/work/test1/.repo/repo/main.py", line 137, in _Run
解决方法:
rm -rf .repo (repo 前面有 .)
./repo init –u ssh://……….
使用repo init 同步没有执行完会产生缓存需删除缓存后再次执行。
问题7:Testing colorized output (for 'repo diff', 'repo status'):black red green yellow blue magenta cyan white
bold dim ul reverse
Enable color display in this user account (y/N)?
解决方法:
直接按回车键
注意:若在同步过程中长时间卡住不动,有可能是因为库太大,或进程卡死,请ctrl+c 键退出再执行,支持断点续传。
问题8:Bad owner or permissions on .ssh/config
解决方法:
sudo chmod 600 .ssh/config
如果已经获取到了源码,可以见详细的源码获取方法:
doc/FAE文档/获取Linux平台源码的方法.pdf
doc/FAE文档/获取源码问题总结.pdf
三 编译方法
vast_v1.0丝印为:PD_X2600_VAST_V1.0,因此编译使用的工程配置文件为:x2600e_vast_v10_nand_5.10_factory_defconfig
vast_v2.0丝印为:PD_X2600_VAST_V2.0,因此编译使用的工程配置文件为:x2600e_vast_v20_nand_5.10_factory_defconfig
如果需要更改默认配置,可以使用工具 IConfigTool 进行配置,详细使用方法见文档:
doc/开发使用说明/IConfigTool 使用文档.pdf
本文档以PD_X2600_VAST_V2.0为例,演示后面的使用情况,如果是PD_X2600_VAST_V1.0开发板,将编译和 IConfigTool 修改的配置文件换成x2600e_vast_v10_nand_5.10_factory_defconfig即可,其他操作都一样。
整体编译:
sxyzhang@T430:~/x2670_sz/build$ make clean # 第一次编译不�需要,后续编译需要执行整体clean操作
sxyzhang@T430:~/x2670_sz/build$ make x2600e_vast_v20_nand_5.10_factory_defconfig
sxyzhang@T430:~/x2670_sz/build$ make
编译后生成固件如下:
sxyzhang@T430:~/x2670_sz/build$ ll output/
总用量 15292
drwxrwxr-x 2 sxyzhang sxyzhang     4096 6月  15 11:28 ./
drwxrwxr-x 6 sxyzhang sxyzhang     4096 6月  15 12:05 ../
-rw-r--r-- 1 sxyzhang sxyzhang 11051008 6月  15 11:28 rootfs.squashfs
-rw-rw-r-- 1 sxyzhang sxyzhang    24576 6月  15 11:28 u-boot-spl-pad.bin
-rw-rw-r-- 1 sxyzhang sxyzhang  4571200 6月  15 12:05 xImage
四 最新烧录工具获取
在ubuntu下执行如下命令可以免密下载:
ubuntu版本:
wget ftp://szingenic:hq7Wy0gws@ftp.ingenic.com.cn/DevSupport/Tools/USBBurner/cloner-latest-ubuntu.tar.gz
windows版本:
wget ftp://szingenic:hq7Wy0gws@ftp.ingenic.com.cn/DevSupport/Tools/USBBurner/cloner-latest-windows.zip
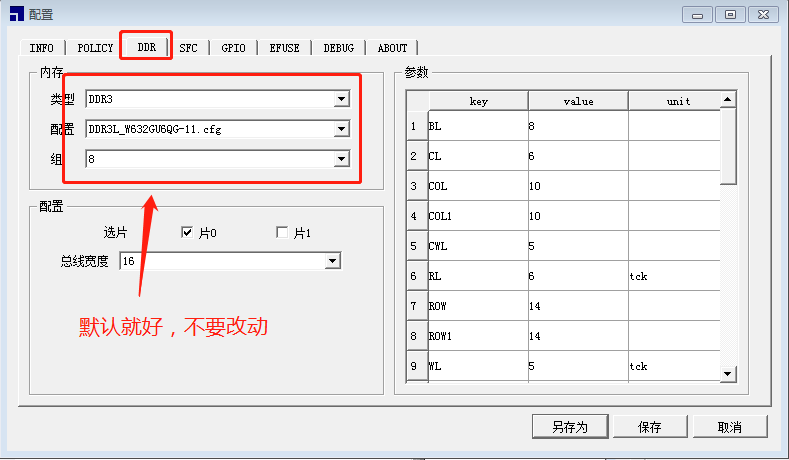
五 烧录方法
注意:
1, vast v1.0开发板配置了新的4Gbit sfc nand flash,因此仅2.5.36.1及以后的烧录工具版本可以支持烧录此开发板,请务必使用对应版本的烧录工具来烧录。
2, vast v2.0开发板配置了新的1Gbit sfc nand flash,用任何版本的烧录工具都可以支持烧录。 建议使用最新版本。
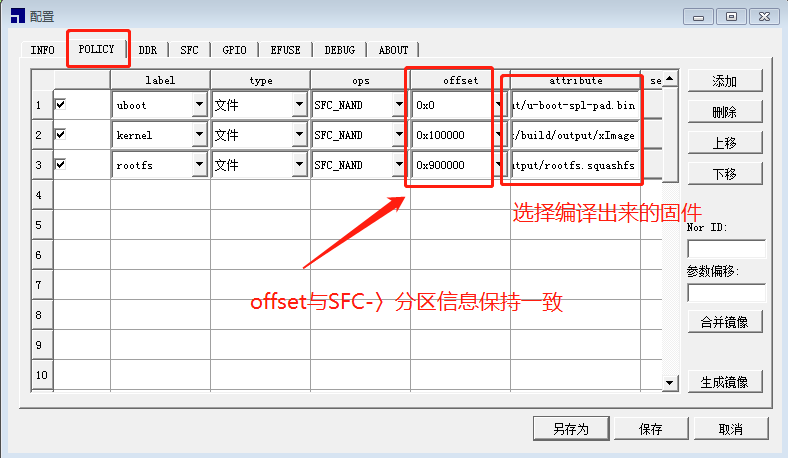
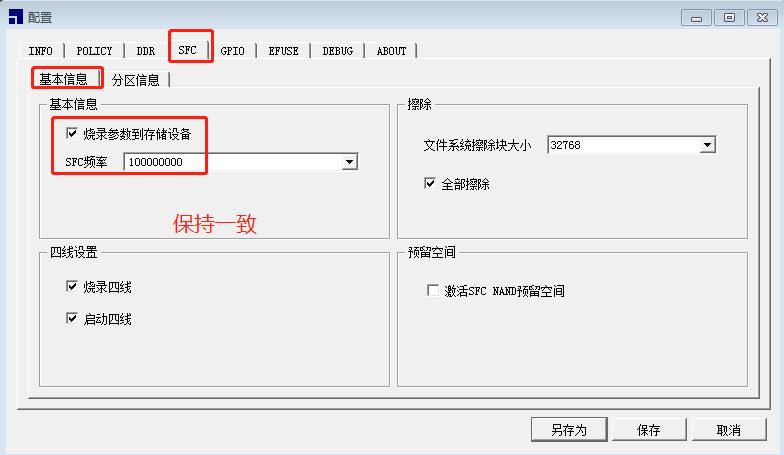
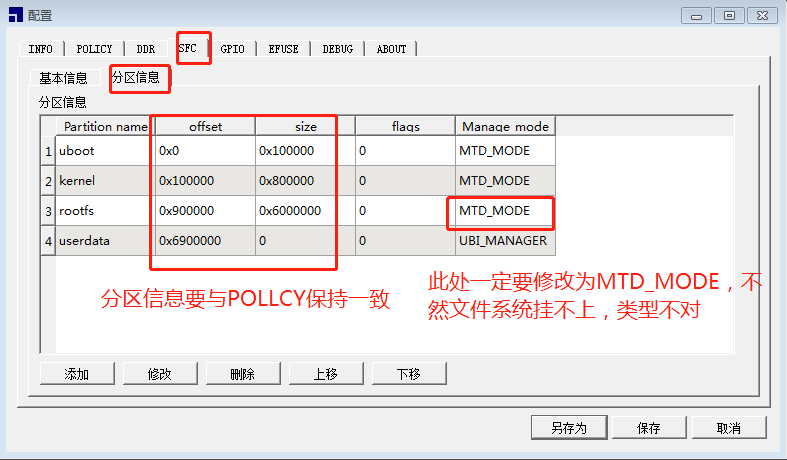
具体烧录配置如下(其他选项卡默认就好):

六 基本功能测试
本配置生成的固件支持工厂测试模式,已经对基础功能运行脚本测试了。具体执行的测试脚本为: /etc/init.d/S99factory_test_shell, 感兴趣的话,可以看一下当前针对各个功能模块测试所执行的命令。
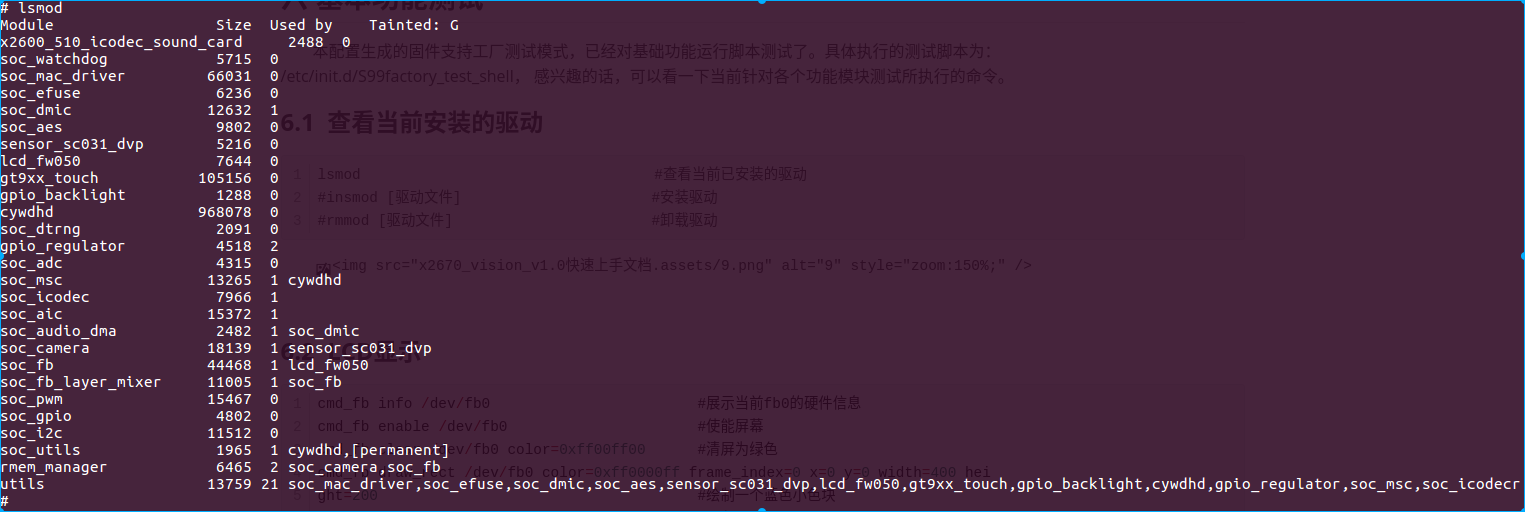
6.1 查看当前安装的驱动
lsmod 								   #查看当前已安装的驱动
#insmod [驱动文件]						#安装驱动
#rmmod [驱动文件]						#卸载驱动
6.2 LCD显示
显示fb0的数据信息:
# cmd_fb info /dev/fb0

address xres yres line_len frames total_size
0f001000 720 1280 2880  2 7372800
在fb0上绘制整屏的绿色,以及(0,0,400,200)的蓝色小色块:
cmd_fb enable /dev/fb0                      #使能屏幕
cmd_fb clear /dev/fb0 color=0xff00ff00      #清屏为绿⾊
cmd_fb draw_rect /dev/fb0 color=0xff0000ff frame_index=0 x=0 y=0 width=400 height=200                                                                 #绘制一个蓝色小色块
cmd_fb display /dev/fb0                     #显⾊
cmd_fb disable /dev/fb0                     #失能屏幕
cmd_fb是君正平台自主研发的用于调试、测试屏及fb的重要工具,客户可以参考其源码进行上层应用的开发。 具体位置如下:
libhardware2/src/cmds/fb_main.c
6.3 camera
显示camera设备的基本信息:
# cmd_camera info /dev/camera

name: sc031-dvp
width: 640
height: 480
fps: 80
data_fmt: GREY
line_length: 640
frame_size: 307200
frame_nums: 3
phys_mem: 0fe11000
mapped_mem: 0x7799f000
将camera取到的图像数据显示到屏幕上:
cmd_camera_software_preview /dev/camera /dev/fb0
cmd_camera是君正平台自主研发用于调试、测试camera的重要工具,客户可以参考其源码进行上层应用的开发。 具体位置如下:
libhardware2/src/cmds/camera_main.c
6.4 录音和播放
6.4.1 列出设备
# 进⼊串⼝调试界⾯后,切换到/usr/data⽬录,执⾏⾳频录制命令

arecord -l

也可以⽤如下�命令来看当前所有alsa设备列表:

可知,当前card0为所配置的dmic设备节点名,device0 可作为录⾳设备。本开发板默认留了 dmic接⼝座⼦,也接了dmic外设,所以可以⽤dmic录⾳的。 card1为当前内部icodec设备节点名,device0 可作为⾳频播放设备。当然了,本开发板icodec 默认不接amic,只有播放时的amic回采,所以card1不可以作为录⾳设备,但是可以做为播放设备。
6.4.2 使用DMIC录音
arecord -Dhw:0,0 -d 10 -f S16_LE -r 16000 -c 2 -t wav /usr/data/test.wav
参数解析
-D 指定了录⾳设备0,0 是card 0 device 0的意思,本例中是DMIC
-d 指定录⾳的时⻓,单位时秒 # 录⾳时⻓:10s
-f 指定录⾳格式 # ⾳频存储格式:S16_LE(有符号16位⼩端存储)
-r 指定了采样率,单位时Hz # 采样频率:16000hz
-c 指定channel 个数 # 通道数:2
-t 指定⽣成的⽂件格式 # ⽂件格式:wav
6.4.3 使用aplay播放
aplay -Dplughw:1,0 /usr/data/test.wav
此时如果板⼦接功放就会有声⾳输出。
6.4.4 出错时的定位
如果可以录⾳但是不能正常播放,则使⽤adb调试⼯具在本地环境中拉取刚刚⽣成的test.wav⽂件 进⾏试听,检查硬件是否正常⼯作
adb pull /usr/data/test.wav ./
拉取成功后会如下显⽰:
/usr/data/test.wav: 1 file pulled. 5.0 MB/s (640044 bytes in 0.122s)
在电脑上建议使⽤audacity ⼯具播放看⼀下数据质量。
6.4.5 软件demo接口程序录音和播放
cmd_alsa 是君正平台自主研发的用于调试音频的重要工具,客户可以参考其源码进行上层应用的开发。 具体位置如下:
libhardware2/src/cmds/alsa_main.c
6.4.5.1 DMIC 录音
cmd_alsa record device=hw:0,0 rate=48000 channels=1 time=10 > /tmp/test.wav
record :实现录⾳功能。
device=hw:0,0 :使⽤card0 的device 0设备,DMIC。
rate=48000 : 采样率为48k。
channels=1:单通道。
time=10 : 录⾳⽂件⻓度为10秒。
/tmp/test.wav : 指定最终⽣成的⾳频⽂件。
将在⽂件系统中⽣成:/tmp/test.wav。
6.4.5.2 ICODEC + SPK播放
cmd_alsa play device=plughw:1,0 rate=48000 channels=1 file=/tmp/test.wav
play :实现播放功能。
device=plughw:1,0 :使⽤card1 的device 0设备,对应icodecsoundcard。
rate=48000 : 采样率为48k。
channels=1:单通道。
file=/tmp/test.wav : 所要播放的⾳频⽂件。
6.5 TF卡
TF 卡的测试就看串口输出信息:

6.6 wifi&BT使用
本开发板使用wifi&BT模组为AW-NM372SM。
由原理图可知,当前硬件连接的是MSC1(PC25~30 )+ uart1(PB0~3)
6.6.1 按照如下格式创建/usr/data/wpa_supplicant.conf文件
# vi /usr/data/wpa_supplicant.conf

ctrl_interface=/var/run/wpa_supplicant
ap_scan=1
network={
        ssid="Guest"
        psk="ingenic_guest"
}
6.6.2 测试wifi
rfkill unblock wifi                                                    # 打开wifi设备
ifconfig wlan0 up                                                      # 打开wlan0设备节点
wpa_supplicant -B -i wlan0 -c /usr/data/wpa_supplicant.conf &          # 配网
udhcpc -i wlan0 &                                                      # 自动分配ip
ping www.baidu.com                                                     # 测试
具体如下:
# cat /usr/data/wpa_supplicant.conf
ctrl_interface=/var/run/wpa_supplicant
ap_scan=1
network={
        ssid="Guest"
        psk="ingenic_guest"
}
#
#
# rfkill unblock wifi
# ifconfig wlan0 up
[168188.557835]
[168188.557835] Dongle Host Driver, version 1.363.125.19 (r)
[168188.557835] Compiled in /home/sxyzhang/my/work/linux/x2670_sz/module_driver/devices/wireless/bcmdhd_1.363.125.19_infineon
[168188.559031] wl_android_wifi_on in
[168188.559264] =========== WLAN placed in RESET ON  ========
[168188.559700] wlan power on: poweron
[168188.559942] bcm_wlan_power_on, RESET
[168188.899408] sdio_reset_comm():
[168188.979356] mmc1: queuing unknown CIS tuple 0x80 (2 bytes)
[168188.991999] mmc1: queuing unknown CIS tuple 0x80 (3 bytes)
[168189.004627] mmc1: queuing unknown CIS tuple 0x80 (3 bytes)
[168189.027057] mmc1: queuing unknown CIS tuple 0x80 (7 bytes)
[168189.034802] mmc1: queuing unknown CIS tuple 0x81 (1 bytes)
[168189.722619] Adding CYW43438 firmware and NVRAM path by CIS
[168189.722619]         firmware path: /lib/firmware/wifi_bcm/cyw43438-7.46.58.13.bin
[168189.722619]         NVRAM path:    /lib/firmware/wifi_bcm/nvram_azw372.txt
[168189.723916]
[168189.723916]
[168189.723916] dhd_bus_devreset: == WLAN ON ==
[168189.724563] F1 signature read @0x18000000=0x1541a9a6
[168189.728203] F1 signature OK, socitype:0x1 chip:0xa9a6 rev:0x1 pkg:0x4
[168189.729904] DHD: dongle ram size is set to 524288(orig 524288) at 0x0
[168189.816378] dhdsdio_write_vars: Download, Upload and compare of NVRAM succeeded.
[168189.880562] dhd_bus_init: enable 0x06, ready 0x06 (waited 0us)
[168189.881245] bcmsdh_oob_intr_register: Enter
[168189.881539] bcmsdh_oob_intr_register OOB irq=73 flags=4
[168189.883064] Disable tdls_auto_op failed. -1
[168189.887613] Firmware up: op_mode=0x0005, MAC=2c:3b:70:c0:f9:33
[168189.894666] dhd_preinit_ioctls Set txbf failed  -23
[168189.896046] dhd_preinit_ioctls Set ampdu_mpdu to 16 failed  -29
[168189.897272] dhd_preinit_ioctls pspretend_threshold for HostAPD failed  -23
[168189.905234] Firmware version = wl0: Apr 19 2018 21:18:23 version 7.46.58.13 (r688474 CY) FWID 01-d4334d3d es4.c3.n4
[168189.907207] dhd_wlfc_hostreorder_init(): successful bdcv2 tlv signaling, 64
[168189.909183] dhd_pno_init: Support Android Location Service
[168189.939266] MACEVENT: WLC_E_IF 54, MAC 2c:3b:70:c0:f9:33, status 0, reason 0, auth 0
[168189.940015] rtt_do_get_ioctl: failed to send getbuf proxd iovar (CMD ID : 1), status=-23
[168189.940577] dhd_rtt_init : FTM is not supported
[168189.942120] dhd_interworking_enable: failed to set WNM info, ret=-23
[168189.944611] MACEVENT: WLC_E_IF 54, MAC 2c:3b:70:c0:f9:33, status 0, reason 0, auth 0
[168189.945269] MACEVENT: WLC_E_IF 54, MAC 2c:3b:70:c0:f9:33, status 0, reason 0, auth 0
[168189.947744] CFG80211-ERROR) wl_update_wiphybands :
[168189.947752] error reading vhtmode (-23)
[168189.958532] wl_create_event_handler(): thread:wl_event_handler:759 started
[168189.959363] CFG80211-ERROR) wl_event_handler :
[168189.959375] tsk Enter, tsk = 0xc103da2e
#
# wpa_supplicant -B -i wlan0 -c /usr/data/wpa_supplicant.conf &
# Successfully initialized wpa_supplicant
[168217.031698] CFG80211-ERROR) wl_run_escan :
[168217.031711] LEGACY_SCAN sync ID: 4660, bssidx: 0
[168217.996765] CFG80211-ERROR) wl_cfg80211_connect :
[168217.996780] Connecting with54:3d:37:42:2e:29 ssid "Guest", len (5) channel=7
[168217.996780]
[168218.028480] MACEVENT: WLC_E_ASSOC_REQ_IE
[168218.028849] MACEVENT: WLC_E_AUTH, MAC 54:3d:37:42:2e:29, Open System, SUCCESS
[168218.079565] MACEVENT: WLC_E_ASSOC_RESP_IE
[168218.080045] MACEVENT: WLC_E_ASSOC, MAC 54:3d:37:42:2e:29, SUCCESS
[168218.080469] dhd_rx_frame: Got BRCM event packet in a chained packet.
[168218.080905] wl_process_host_event: Link event 16, flags 1, status 0
[168218.081330] MACEVENT: WLC_E_LINK UP
[168218.081578] dhd_rx_frame: Got BRCM event packet in a chained packet.
[168218.081602] wl_bss_connect_done succeeded with 54:3d:37:42:2e:29
[168218.082006] ETHER_TYPE_802_1X [RX]: ver 2, type 3, replay 1
[168218.092353] ETHER_TYPE_802_1X [RX]: ver 2, type 3, replay 2
[168218.146276] MACEVENT: WLC_E_JOIN, MAC 54:3d:37:42:2e:29
[168218.146737] MACEVENT: WLC_E_SET_SSID, MAC 54:3d:37:42:2e:29
[168218.147183] wl_bss_connect_done succeeded with 54:3d:37:42:2e:29

[1]+  Done                       wpa_supplicant -B -i wlan0 -c /usr/data/wpa_supplicant.conf
#
# udhcpc -i wlan0 &
# udhcpc: started, v1.31.1
udhcpc: sending discover
[168232.409397] DHCP - DISCOVER [TX] [REQUEST]
[168235.254604] DHCP - OFFER [RX] [REPLY]
udhcpc: sending select for 10.4.229.83
[168235.289377] DHCP - REQUEST [TX] [REQUEST]
[168235.293689] DHCP - ACK [RX] [REPLY]
udhcpc: lease of 10.4.229.83 obtained, lease time 86400
deleting routers
adding dns 114.114.114.114
adding dns 8.8.8.8

[1]+  Done                       udhcpc -i wlan0
#
# ping www.baidu.com
PING www.baidu.com (14.119.104.254): 56 data bytes
64 bytes from 14.119.104.254: seq=0 ttl=55 time=8.572 ms
64 bytes from 14.119.104.254: seq=1 ttl=55 time=15.366 ms
64 bytes from 14.119.104.254: seq=2 ttl=55 time=24.529 ms
64 bytes from 14.119.104.254: seq=3 ttl=55 time=15.341 ms
6.6.3 测试BT
# cd /usr/bin/
# ./bt_enable_bsa.sh
# cp /etc/factory_test/app_manager /run/blue_bsa/
# cd /run/blue_bsa/
# ./app_manager
BSA_trace 1@ 01/01 00h:22m:25s:145ms: BSA_MgtOpenInit
BSA_trace 2@ 01/01 00h:22m:25s:145ms: BSA_MgtOpen (./)
Created thread with thread_id=  77c95490
BSA_trace 3@ 01/01 00h:22m:25s:146ms: bsa_cl_mgt_init
BSA_trace 4@ 01/01 00h:22m:25s:146ms: UIPC_Init
BSA_trace 5@ 01/01 00h:22m:25s:146ms: UIPC_Open ChId:3
DEBUG: app_mgr_read_config: Enable:1
DEBUG: app_mgr_read_config: Discoverable:1
DEBUG: app_mgr_read_config: Connectable:1
DEBUG: app_mgr_read_config: Name:OceanWing BSA Bluetooth Device
DEBUG: app_mgr_read_config: BLE Name:OceanWing BSA BLE Device
DEBUG: app_mgr_read_config: Bdaddr be:ef:be:ef:ea:5e
DEBUG: app_mgr_read_config: ClassOfDevice:00:04:24 => Audio/Video
DEBUG: app_mgr_read_config: RootPath:./pictures
DEBUG: app_mgr_read_config: Default PIN (4):0000
ERROR: app_xml_read_db: open(./bt_devices.xml) failed
ERROR: app_mgr_read_remote_devices: app_xml_read_db failed:-1
ERROR: app_mgr_config: No remote device database found
BSA_trace 6@ 01/01 00h:22m:25s:146ms: BSA_DmGetConfigInit
BSA_trace 7@ 01/01 00h:22m:25s:146ms: BSA_DmGetConfig
DEBUG: app_mgr_get_bt_config: Enable:1
DEBUG: app_mgr_get_bt_config: Discoverable:0
DEBUG: app_mgr_get_bt_config: Connectable:0
DEBUG: app_mgr_get_bt_config: Name:Broadcom Bluetooth Device
DEBUG: app_mgr_get_bt_config: BLE Name:Broadcom Bluetooth Device
DEBUG: app_mgr_get_bt_config: Bdaddr 2c:3b:70:c0:f9:32
DEBUG: app_mgr_get_bt_config: ClassOfDevice:00:00:00
DEBUG: app_mgr_get_bt_config: First host disabled channel:255
DEBUG: app_mgr_get_bt_config: Last host disabled channel:255
DEBUG: app_mgr_sec_set_security:
BSA_trace 8@ 01/01 00h:22m:25s:147ms: BSA_SecSetSecurityInit
BSA_trace 9@ 01/01 00h:22m:25s:147ms: BSA_SecSetSecurity
Add all devices found in database
ERROR: app_xml_read_si_db: open(./si_devices.xml) failed
ERROR: app_read_xml_si_devices: app_xml_read_si_db failed: -1
BSA_trace 10@ 01/01 00h:22m:25s:147ms: BSA_DmSetConfigInit
DEBUG: app_mgr_set_bt_config: Enable:1
DEBUG: app_mgr_set_bt_config: Discoverable:1
DEBUG: app_mgr_set_bt_config: Connectable:1
DEBUG: app_mgr_set_bt_config: Name:OceanWing BSA Bluetooth Device
DEBUG: app_mgr_set_bt_config: BLE Name:OceanWing BSA BLE Device
DEBUG: app_mgr_set_bt_config: Bdaddr be:ef:be:ef:ea:5e
DEBUG: app_mgr_set_bt_config: ClassOfDevice:00:04:24
DEBUG: app_mgr_set_bt_config: First host disabled channel:79
DEBUG: app_mgr_set_bt_config: Last host disabled channel:79
BSA_trace 11@ 01/01 00h:22m:25s:147ms: BSA_DmSetConfig
BSA_trace 12@ 01/01 00h:22m:25s:259ms: BSA_TmReadVersionInit
BSA_trace 13@ 01/01 00h:22m:25s:259ms: BSA_TmReadVersion
Server status:0
FW Version:1.2.9.482
BSA Server Version:BSA0107_00.28.09_ingenic_mips_gcc720
DEBUG: app_dm_get_dual_stack_mode: Get DualStackMode
BSA_trace 14@ 01/01 00h:22m:25s:259ms: BSA_DmGetConfigInit
BSA_trace 15@ 01/01 00h:22m:25s:259ms: BSA_DmGetConfig
Current DualStack mode:DUAL_STACK_MODE_BSA
Bluetooth Application Manager Main menu:
        1 => Abort Discovery
        2 => Discovery
        3 => Discovery test
        4 => Bonding
        5 => Cancel Bonding
        6 => Remove device from security database
        7 => Services Discovery (all services)
        8 => Device Id Discovery
        9 => Set local Device Id
        10 => Get local Device Id
        11 => Stop Bluetooth
        12 => Restart Bluetooth
        13 => Accept Simple Pairing
        14 => Refuse Simple Pairing
        15 => Enter BLE Passkey
        16 => Act As HID Keyboard (SP passkey entry)
        17 => Read Device configuration
        18 => Read Local Out Of Band data
        19 => Enter remote Out Of Band data
        20 => Set device visibility
        21 => Set device BLE visibility
        22 => Set AFH Configuration
        23 => Set Tx Power Class2 (specific FW needed)
        24 => Set Tx Power Class1.5 (specific FW needed)
        25 => Change Dual Stack Mode (currently:DUAL_STACK_MODE_BSA)
        26 => Set Link Policy
        27 => Enter Passkey
        28 => Get Remote Device Name
        29 => RSSI Measurement
        30 => Set class of device
        96 => Kill BSA server
        97 => Connect to BSA server
        98 => Disconnect from BSA server
        99 => Quit
Select action => 2
Start Regular Discovery
BSA_trace 16@ 01/01 00h:22m:30s:941ms: BSA_DiscStartInit
BSA_trace 17@ 01/01 00h:22m:30s:941ms: BSA_DiscStart
Bluetooth Application Manager Main menu:
        1 => Abort Discovery
        2 => Discovery
        3 => Discovery test
        4 => Bonding
        5 => Cancel Bonding
        6 => Remove device from security database
        7 => Services Discovery (all services)
        8 => Device Id Discovery
        9 => Set local Device Id
        10 => Get local Device Id
        11 => Stop Bluetooth
        12 => Restart Bluetooth
        13 => Accept Simple Pairing
        14 => Refuse Simple Pairing
        15 => Enter BLE Passkey
        16 => Act As HID Keyboard (SP passkey entry)
        17 => Read Device configuration
        18 => Read Local Out Of Band data
        19 => Enter remote Out Of Band data
        20 => Set device visibility
        21 => Set device BLE visibility
        22 => Set AFH Configuration
        23 => Set Tx Power Class2 (specific FW needed)
        24 => Set Tx Power Class1.5 (specific FW needed)
        25 => Change Dual Stack Mode (currently:DUAL_STACK_MODE_BSA)
        26 => Set Link Policy
        27 => Enter Passkey
        28 => Get Remote Device Name
        29 => RSSI Measurement
        30 => Set class of device
        96 => Kill BSA server
        97 => Connect to BSA server
        98 => Disconnect from BSA server
        99 => Quit
Select action => 2
Start Regular Discovery
BSA_trace 18@ 01/01 00h:22m:33s:647ms: BSA_DiscStartInit
BSA_trace 19@ 01/01 00h:22m:33s:647ms: BSA_DiscStart
BSA_trace 20@ 01/01 00h:22m:33s:647ms: BSA_DiscStart bsa_send_receive_message fails status:900
ERROR: app_disc_start_regular: BSA_DiscStart failed status:900
Bluetooth Application Manager Main menu:
        1 => Abort Discovery
        2 => Discovery
        3 => Discovery test
        4 => Bonding
        5 => Cancel Bonding
        6 => Remove device from security database
        7 => Services Discovery (all services)
        8 => Device Id Discovery
        9 => Set local Device Id
        10 => Get local Device Id
        11 => Stop Bluetooth
        12 => Restart Bluetooth
        13 => Accept Simple Pairing
        14 => Refuse Simple Pairing
        15 => Enter BLE Passkey
        16 => Act As HID Keyboard (SP passkey entry)
        17 => Read Device configuration
        18 => Read Local Out Of Band data
        19 => Enter remote Out Of Band data
        20 => Set device visibility
        21 => Set device BLE visibility
        22 => Set AFH Configuration
        23 => Set Tx Power Class2 (specific FW needed)
        24 => Set Tx Power Class1.5 (specific FW needed)
        25 => Change Dual Stack Mode (currently:DUAL_STACK_MODE_BSA)
        26 => Set Link Policy
        27 => Enter Passkey
        28 => Get Remote Device Name
        29 => RSSI Measurement
        30 => Set class of device
        96 => Kill BSA server
        97 => Connect to BSA server
        98 => Disconnect from BSA server
        99 => Quit
Select action => New Discovered device:0
        Bdaddr:3c:f8:62:fd:16:db
        Name:LAPTOP-2JL24M0B
        ClassOfDevice:2a:01:0c => Computer
        Services:0x00000000 ()
        Rssi:-49
        DeviceType:BR/EDR InquiryType:BR AddressType:Public
        Extended Information:
            FullName: LAPTOP-2JL24M0B
            TxPower:9 dB
            Complete Service [UUID16]:
                0x110C [A/V Remote Control Target]
                0x110A [Audio Source]
                0x110E [A/V Remote Control]
                0x110B [Audio Sink]
                0x111F [Handsfree Audio Gateway]
                0x111E [Handsfree]
New Discovered device:1
        Bdaddr:04:7f:0e:35:f3:f4
        Name:wulihong-PC
        ClassOfDevice:1c:01:04 => Computer
        Services:0x00000000 ()
        Rssi:-61
        VidSrc:2 Vid:0x1D6B Pid:0x0246 Version:0x0532
        DeviceType:BR/EDR InquiryType:BR AddressType:Public
        Extended Information:
            FullName: wulihong-PC
            TxPower:0 dB
            DeviceId: VendorId:0x1D6B [USB] ProductId:0x0246 Version:0x0532
            Complete Service [UUID16]:
                0x110E [A/V Remote Control]
                0x110C [A/V Remote Control Target]
                0x1133 [Message Notification Server]
                0x1132 [Message Access Server]
                0x112F [Phonebook Server]
                0x1104 [IrMC Sync]
                0x1106 [OBEX File Transfer]
                0x1105 [OBEX Object Push]
                0x1112 [Headset Audio Gateway]
                0x1108 [Headset]
                0x110B [Audio Sink]
                0x110A [Audio Source]
            Complete Service [UUID128]:
                0x010000EE020000800010000005500000
New Discovered device:2
        Bdaddr:be:ef:be:ef:c7:c4
        Name:OceanWing BSA Bluetooth Device
        ClassOfDevice:00:04:24 => Audio/Video
        Services:0x00000000 ()
        Rssi:-62
        DeviceType:BR/EDR InquiryType:BR AddressType:Public
        Extended Information:
            FullName: OceanWing BSA Bluetooth Device
            Complete Service [UUID16]:
                0x1200 [PnP Information]
            TxPower:0 dB
New Discovered device:3
        Bdaddr:14:f5:f9:2b:e4:c9
        Name:
        ClassOfDevice:00:00:00 => Misc device
        Services:0x00000000 ()
        Rssi:-67
        DeviceType:BLE InquiryType:BLE AddressType:Public
        Extended Information:
            Flags:0x6 [LE_General No_BR/EDR ]
            Manufacturer Specific CompanyId:0x038F [Unknown]:
                Data: 0A 10 FF FF FF B9 BD 2B F9 F5 14 E0
BSA_trace 21@ 01/01 00h:22m:36s:474ms: bsa_sec_event_hdlr event:0
DEBUG: app_mgr_security_callback: event:0
DEBUG: app_mgr_security_callback: BSA_SEC_LINK_UP_EVT bd_addr: 18:bc:5a:0f:9f:6c
DEBUG: app_mgr_security_callback: ClassOfDevice:00:00:00 => Misc device
DEBUG: app_mgr_security_callback: LinkType: 2
BSA_trace 22@ 01/01 00h:22m:51s:441ms: bsa_sec_event_hdlr event:1
DEBUG: app_mgr_security_callback: event:1
DEBUG: app_mgr_security_callback: BSA_SEC_LINK_DOWN_EVT bd_addr: 18:bc:5a:0f:9f:6c
DEBUG: app_mgr_security_callback: Reason: 19
DEBUG: app_mgr_security_callback: LinkType: 2
New Discovered device:4
        Bdaddr:18:bc:5a:0f:9f:6c
        Name:
        ClassOfDevice:00:00:00 => Misc device
        Services:0x00000000 ()
        Rssi:-68
        DeviceType:BLE InquiryType:BLE AddressType:Random
        Extended Information:
            Flags:0x1a [LE_General Controller_LE/BR/EDR Host_LE/BR/EDR]
            Manufacturer Specific CompanyId:0x0100 [TomTom International BV]:
                Data: B5 00 02 38 B3 C8 15 00 00 00 0F 79 16 7F B5 01
                Data: 10 00 00 00
            Complete Service [UUID16]:
                0xFE3C [Unknown]
New Discovered device:5
        Bdaddr:00:00:00:00:01:49
        Name:gty3433_BLE
        ClassOfDevice:00:00:00 => Misc device
        Services:0x00000000 ()
        Rssi:-74
        DeviceType:BLE InquiryType:BLE AddressType:Public
        Extended Information:
            Flags:0x6 [LE_General No_BR/EDR ]
            Incomplete Service [UUID16]:
                0xCB02 [Unknown]
            FullName: gty3433_BLE
            Flags:0x6 [LE_General No_BR/EDR ]
Discovery complete
6.7 以太网
6.7.1 查看设备节点
默认有配置以太网,因此ifconfig -a应该可以看到eth0设备节点。注意:此处需用网线连接开发板和PC(或路由器)。
# ifconfig -a

eth0      Link encap:Ethernet  HWaddr 4A:7F:F9:44:8A:F9
          inet addr:194.169.3.125  Bcast:194.169.3.255  Mask:255.255.255.0
          UP BROADCAST RUNNING MULTICAST  MTU:1500  Metric:1
          RX packets:71 errors:0 dropped:0 overruns:0 frame:0
          TX packets:0 errors:0 dropped:0 overruns:0 carrier:0
          collisions:0 txqueuelen:1000
          RX bytes:6755 (6.5 KiB)  TX bytes:0 (0.0 B)
          Interrupt:63

lo        Link encap:Local Loopback
          inet addr:127.0.0.1  Mask:255.0.0.0
          UP LOOPBACK RUNNING  MTU:65536  Metric:1
          RX packets:10 errors:0 dropped:0 overruns:0 frame:0
          TX packets:10 errors:0 dropped:0 overruns:0 carrier:0
          collisions:0 txqueuelen:1000
          RX bytes:1120 (1.0 KiB)  TX bytes:1120 (1.0 KiB)

wlan0     Link encap:Ethernet  HWaddr 2C:3B:70:C0:F9:33
          inet addr:10.4.229.83  Bcast:10.4.229.255  Mask:255.255.255.0
          UP BROADCAST RUNNING MULTICAST  MTU:1500  Metric:1
          RX packets:1960 errors:0 dropped:459 overruns:0 frame:0
          TX packets:34 errors:0 dropped:0 overruns:0 carrier:0
          collisions:0 txqueuelen:1000
          RX bytes:166986 (163.0 KiB)  TX bytes:4820 (4.7 KiB)

###
6.7.2 进行如下配置并测试
ifconfig eth0 10.4.3.3 netmask 255.255.255.0 up                  # 设置ip和⼦⽹掩码
route add default gw 10.4.3.1                                    # 配置⽹关地址
ping www.baidu.com                                               # 测试
具体如下:
# ifconfig -a
eth0      Link encap:Ethernet  HWaddr FE:3A:50:D7:F0:C4
          inet addr:194.169.3.125  Bcast:194.169.3.255  Mask:255.255.255.0
          UP BROADCAST RUNNING MULTICAST  MTU:1500  Metric:1
          RX packets:115 errors:0 dropped:0 overruns:0 frame:0
          TX packets:9 errors:0 dropped:0 overruns:0 carrier:0
          collisions:0 txqueuelen:1000
          RX bytes:11026 (10.7 KiB)  TX bytes:378 (378.0 B)
          Interrupt:63

lo        Link encap:Local Loopback
          inet addr:127.0.0.1  Mask:255.0.0.0
          UP LOOPBACK RUNNING  MTU:65536  Metric:1
          RX packets:10 errors:0 dropped:0 overruns:0 frame:0
          TX packets:10 errors:0 dropped:0 overruns:0 carrier:0
          collisions:0 txqueuelen:1000
          RX bytes:1120 (1.0 KiB)  TX bytes:1120 (1.0 KiB)

wlan0     Link encap:Ethernet  HWaddr D0:31:10:00:00:00
          BROADCAST MULTICAST  MTU:1500  Metric:1
          RX packets:30 errors:0 dropped:155 overruns:0 frame:0
          TX packets:20 errors:0 dropped:0 overruns:0 carrier:0
          collisions:0 txqueuelen:1000
          RX bytes:3202 (3.1 KiB)  TX bytes:3126 (3.0 KiB)

#
#
# ifconfig eth0 10.4.3.3 netmask 255.255.255.0 up
#
#
# route add default gw 10.4.3.1
#
#
# ping www.baidu.com
PING www.baidu.com (14.119.104.254): 56 data bytes
64 bytes from 14.119.104.254: seq=0 ttl=55 time=7.024 ms
64 bytes from 14.119.104.254: seq=1 ttl=55 time=7.881 ms
64 bytes from 14.119.104.254: seq=2 ttl=55 time=8.126 ms
64 bytes from 14.119.104.254: seq=3 ttl=55 time=8.139 ms
^C
--- www.baidu.com ping statistics ---
4 packets transmitted, 4 packets received, 0% packet loss
round-trip min/avg/max = 7.024/7.792/8.139 ms
#
#
# ifconfig -a
eth0      Link encap:Ethernet  HWaddr FE:3A:50:D7:F0:C4
          inet addr:10.4.3.3  Bcast:10.4.3.255  Mask:255.255.255.0
          UP BROADCAST RUNNING MULTICAST  MTU:1500  Metric:1
          RX packets:185 errors:0 dropped:0 overruns:0 frame:0
          TX packets:21 errors:0 dropped:0 overruns:0 carrier:0
          collisions:0 txqueuelen:1000
          RX bytes:17575 (17.1 KiB)  TX bytes:2110 (2.0 KiB)
          Interrupt:63

lo        Link encap:Local Loopback
          inet addr:127.0.0.1  Mask:255.0.0.0
          UP LOOPBACK RUNNING  MTU:65536  Metric:1
          RX packets:10 errors:0 dropped:0 overruns:0 frame:0
          TX packets:10 errors:0 dropped:0 overruns:0 carrier:0
          collisions:0 txqueuelen:1000
          RX bytes:1120 (1.0 KiB)  TX bytes:1120 (1.0 KiB)

wlan0     Link encap:Ethernet  HWaddr D0:31:10:00:00:00
          BROADCAST MULTICAST  MTU:1500  Metric:1
          RX packets:30 errors:0 dropped:155 overruns:0 frame:0
          TX packets:20 errors:0 dropped:0 overruns:0 carrier:0
          collisions:0 txqueuelen:1000
          RX bytes:3202 (3.1 KiB)  TX bytes:3126 (3.0 KiB)
6.8 usb
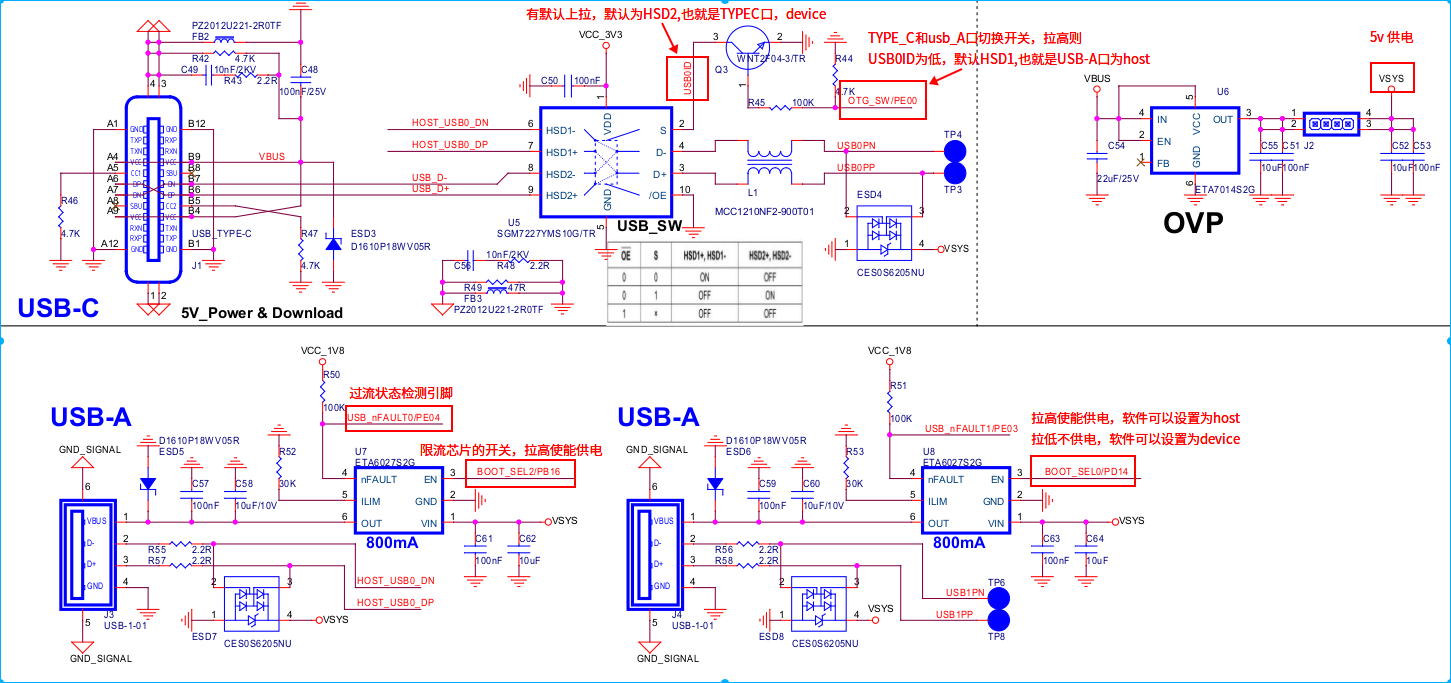
Type-C口输入5v供电VBUS,通过OVP电路分出VSYS给系统供电。
VSYS通过U7、U8的开关(PB16、PD14)给两个USB-A供电,可以控制开关。
Type-C和左下方的usb-A共用cpu的同一路usb0: usb otg2.0。 切换开关为PE00.
PE00默认为输入拉高脚。不操作时,USB0ID硬件有上拉,所以S为高,默认为HSD2导通,同时因为USB0的ID pin(USB0ID)默认为高,那么此时usb0是device状态。也就是默认状态下usb0导通Type-C口,作为device使用。
PE00可以通过gpio上拉,此时USB0ID为0,则导通HSD1口,即左下角的USB-A口。同时因为USB0ID为0,那么此时usb0处于host模式。 此时左下角的USB-A口只能工作在host模式,需PB16=1供电。
右下角的USB-A口对应usb1,可以工作在host模式,也可以为device。PD14=0,软件可以设置为device。PD14=1,软件可以设置为host。不能自动切换。
右下角的USB-A口对应usb1, 芯片内部设计的有host的PHY,但是device的PHY就是与usb0共用的,所以usb0和usb1只能由一个处于device模式。两者可以同时处于host模式。
内核配置如下:
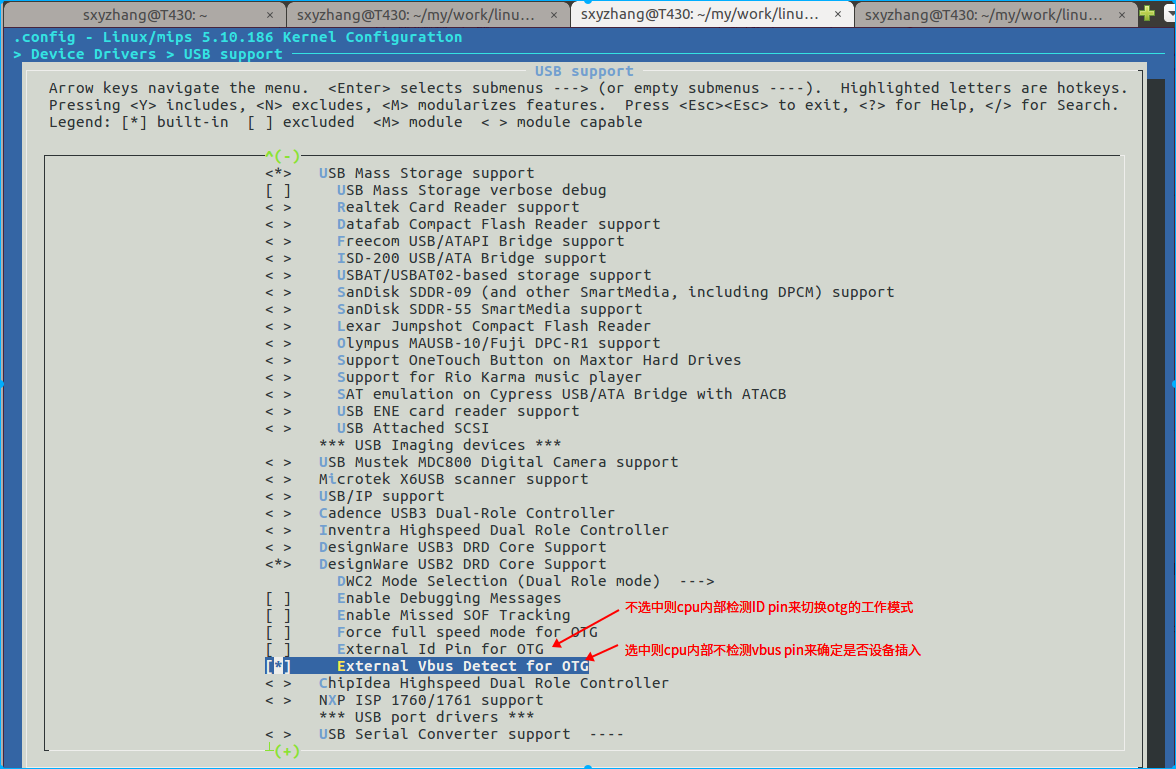
A, 默认usb0 otg接Type-C口,由Type-C进行5v供电。工作为device�。
B, PE00 = 1时,usb0 otg接左下角的usb-A口,默认是host模式。需插入type-c线整体供电,同时PB16=1给左下角的usb-A供电。
C, 右下角的usb-A口接usb1。需插入type-c线整体供电。PD14=1时软件可以设置为host模式.PD14=0时软件可以设置为device模式.
6.9 视频播放和LVGL demo UI播放视频
代码库的如下位置文档有专门介绍:doc/FAE文档/X2670_vision_v1.0/x2670_vision_v1.0快速上手文档.pdf