X2600 secureboot实现加密spl + 加密kernel+验签根文件系统
一 安全启动说明
- CPU 启动的时验证 SPL 的的签名,保证代码没有更改过。 利⽤ RSA 的⾮对称加解特性, 私钥加密, 只有公钥可以解密. 把 SPL 的 HASH 值加密, 在启动的时候验通过公钥解密,检校 HASH 是否正确. 这样只有有私钥的才能使⽤, 防⽌代码发⽣变化.
- CPU启动时候使⽤ USERKEY 解密(可选) 代码段可以通过 AES 加密. 启动过程中⽤ AES 解密, 保证⽤⼾的代码是加密的, 防⽌泄露. AES 的秘钥要与 CPU 内部烧录的秘钥相同.
- CPU 启动时候使⽤ CHIPKEY 解密(可选) 代码是通过 CPU 的⾃⾝的 CHIPKEY 解密的, 每个CPU的 CHIPKEY 是不同的, ⽽通过这个 KEY 加密的 Firmware 也是不同的, 保证了 FLASH ⾥⾯的代码是⽆法 COPY 的
CPU 内部保存了3个 KEY:
- RSA的公钥签名, 保证公钥是和⽤⼾的私钥对应.
- USERKEY, 保证⽤⼾使⽤ OTA 时代码是加密的.
- CHIPKEY, 保证每个 CPU 的KEY是不同的.
这三个 KEY 是保存 CPU 内部 EFUSE 中, 在⾮安全核不可读取, 对外不开放. 在使⽤安全 BOOT 前需要烧录, 并打开security功能的BIT位.
具体加密流程如下:
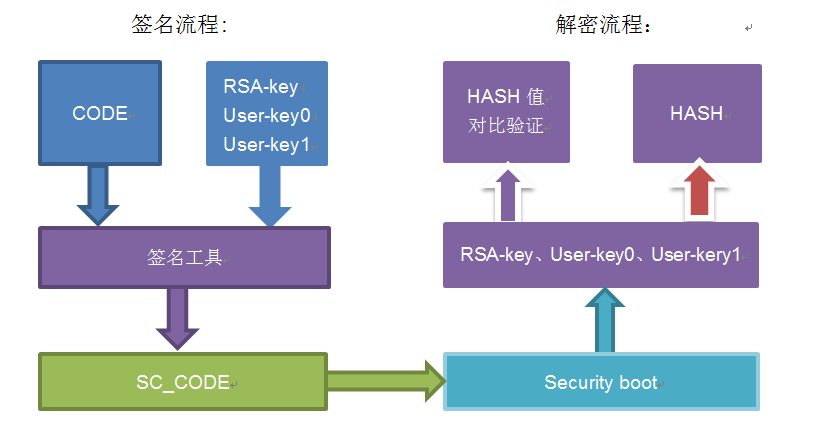
对于 rootfs,采用只签名,不加密的方式
二 软硬件环境说明
⽀持X1600、X2000、X2600系列CPU,已在Darwin(x2000),Halley6(x1600e),VAST(x2600e)开发板验证.
2.1 硬件环境说明
需要有对 efuse 使能的电路.
此处注意x2000及x1600e电路外接io及默认使能电平需要与烧录工具efuse设置匹配. io不对会导致烧录不进去,电平不匹配会导致芯片可能烧坏.
x2600不需要.
2.2 软件环境说明
以PD_X2600_EVB_V2.0开发板为例, uboot配置和kernel配置如下:
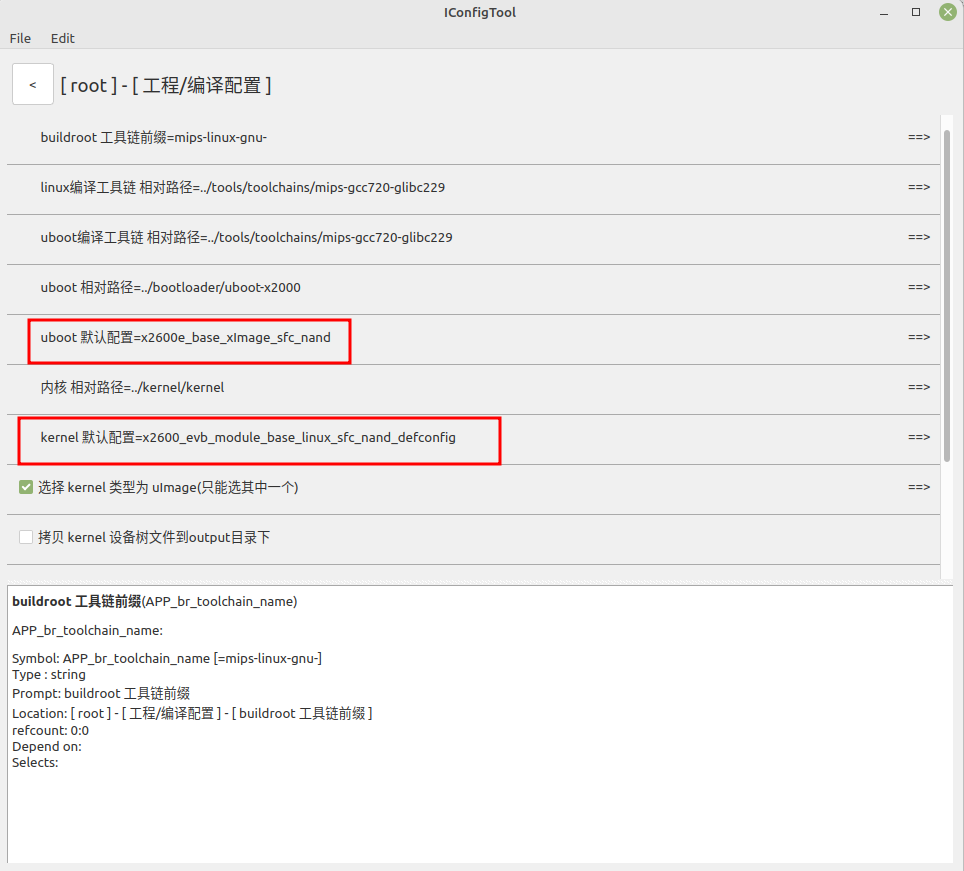
需修改 uboot 工程中的文件,使用配置为 x2600e_nand_5.10_defconfig
kenny@kenny-MS-7B89:~/source/linux_source_ingenic/build$ grep -nr "uboot" configs/x2600e_nand_5.10_defconfig
3:APP_uboot_toolchain_dir=../tools/toolchains/mips-gcc720-glibc229
4:APP_uboot_dir=../bootloader/uboot-x2000
5:APP_uboot_config=x2600e_base_uImage_quickstart_sfc_nand                      //uboot配置(使用rtos启动kernel的配置)
查找/Linux工程目录/bootloader/uboot-x2000/boards.cfg内的x2600e_base_uImage_quickstart_sfc_nand
x2600e_base_uImage_quickstart_sfc_nand mips xburst2 x2600_base ingenic x2600 x2600_base:SPL_SFC_NAND,MTD_SFCNAND,SPL_OS_BOOT,SPL_PARAMS_FIXER,X2600E_DDR,RMEM_MB=16,QUICK_START,LPJ="11935744"
可以看到uboot使用的为x2600_base, 位于bootloader/uboot-x2000/include/configs下的x2600_base.h文件, 改动后内容如下:
#ifndef __X2600_BASE_H__
#define	__X2600_BASE_H__

#define CONFIG_ROOTFS_SQUASHFS
#define CONFIG_ROOTFS2_SQUASHFS
#define CONFIG_ARG_QUIET
#define CONFIG_SPL_SERIAL_SUPPORT   //这行需要删除掉,不然编译会编译不通过

/* 添加以下 3 个宏 */
#define CONFIG_SPL_RTOS_LOAD_KERNEL
#define CONFIG_JZ_SCBOOT
#define CONFIG_JZ_SECURE_SUPPORT


#include "x2600_base_common.h"

#endif /* __X2600_BASE_H__ */
kernel 编译配置文件
kenny@kenny-MS-7B89:~/source/linux_source_ingenic/build$ grep -nr "kernel" configs/x2600e_nand_5.10_defconfig
6:APP_kernel_dir=../kernel/kernel
7:APP_kernel_config=x2600_evb_module_base_linux_sfc_nand_defconfig //kernel 配置
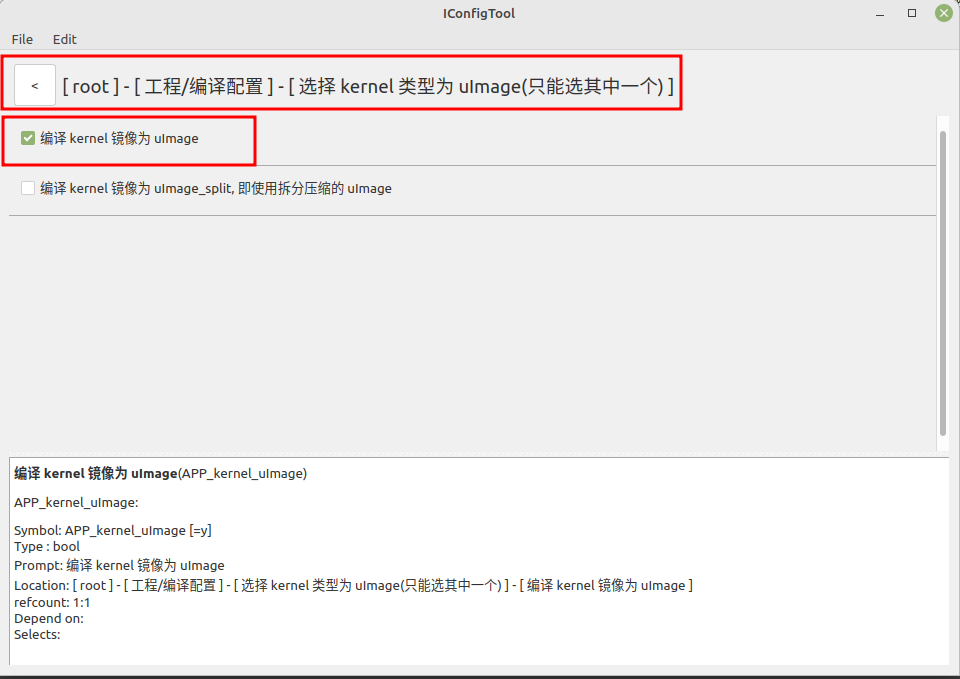
9:APP_kernel_uImage=y //kernel 镜像类型选择 uImage
10:# APP_kernel_uImage_split is not set
11:# APP_kernel_dtb is not set
kernel 镜像类型,选择uImage
编译linux固件命令:
kenny@kenny-MS-7B89:~/source/linux_source_ingenic/build$ make clean;make x2600e_nand_5.10_defconfig;make
RTOS系统配置文件
本文默认使用的是nand,nor也可以支持, 但是对于 nand 介质来说,rtos 不能挂载文件系统,因为 rtos 和 linux 的文件系统格式不一样,如果在 rtos 挂载文件系统,会破坏 linux 文件系统的分区(需在 rtos 的 iconfig 中取消掉文件系统勾选)
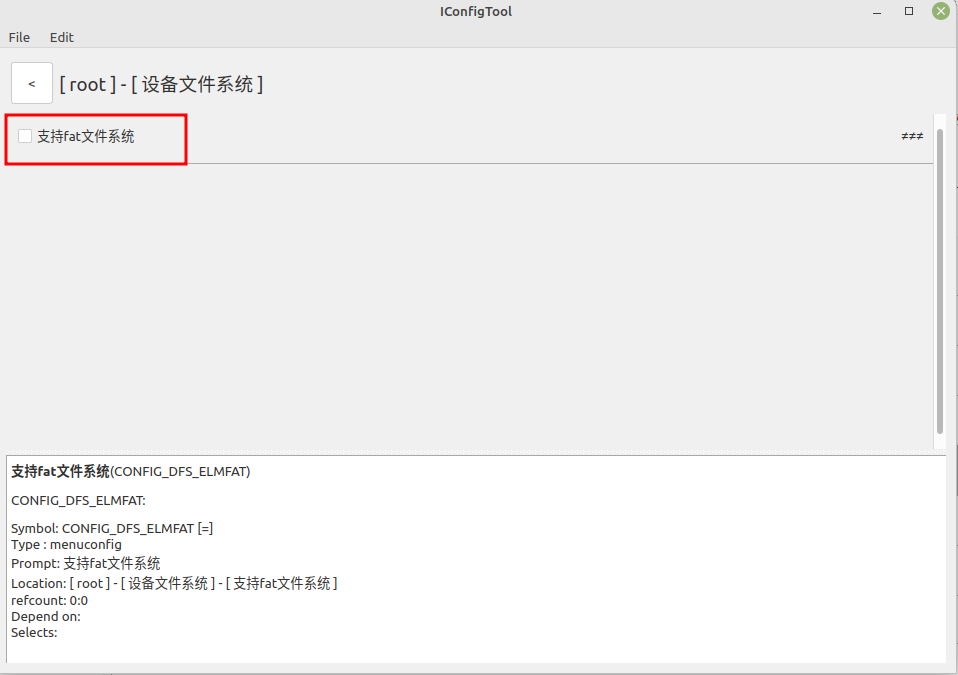
这里的支持fat文件系统不能勾选
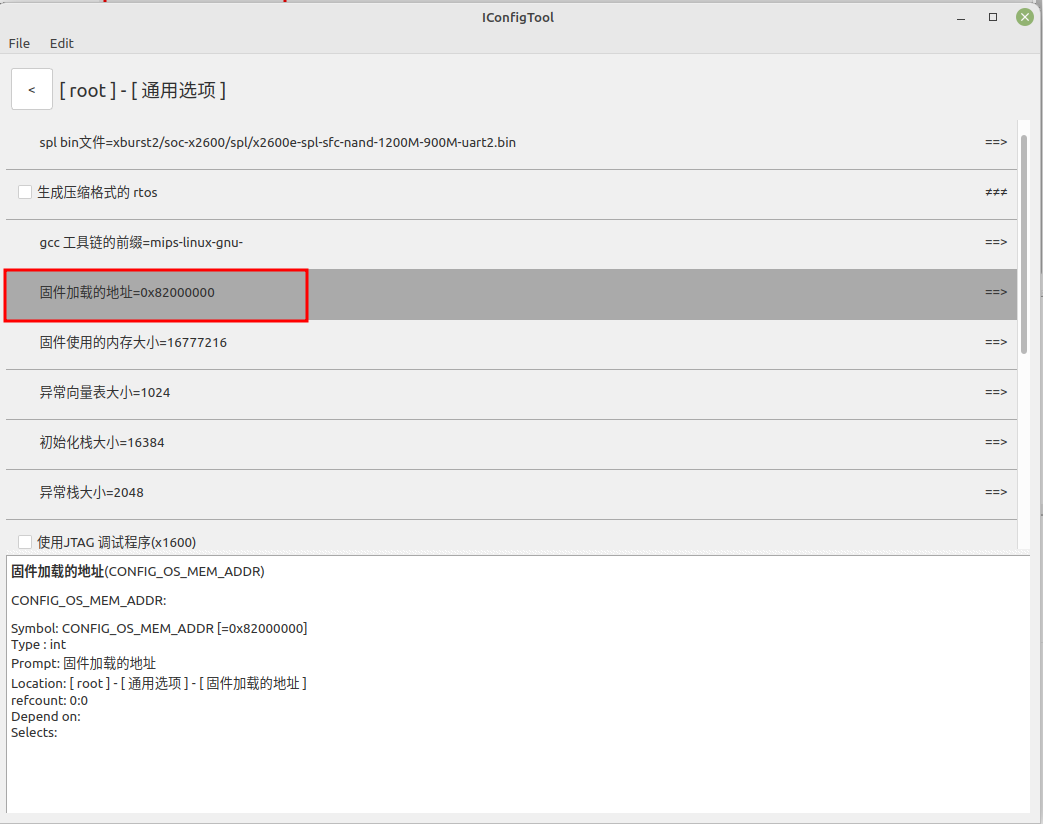
由于设置rtos的加载地址为内存的后半段,不与kernel的固件地址重合,所以这里的固件加载地址设置为 0x82000000
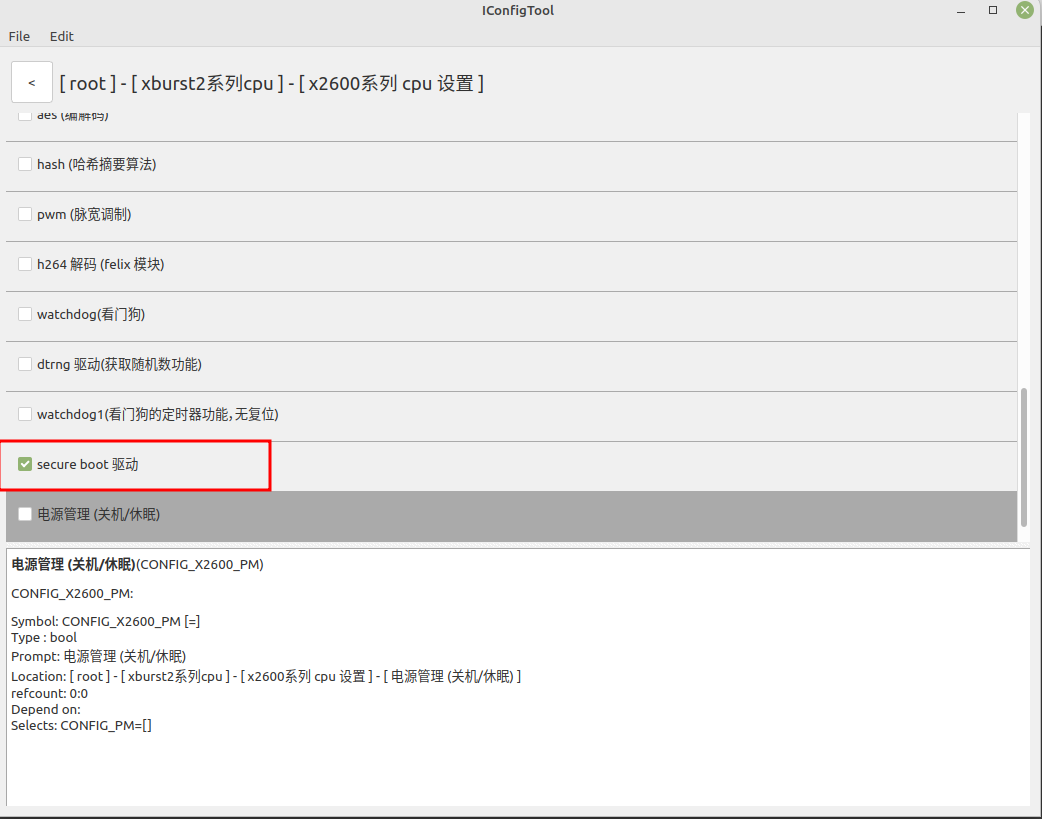
勾选 secure boot驱动
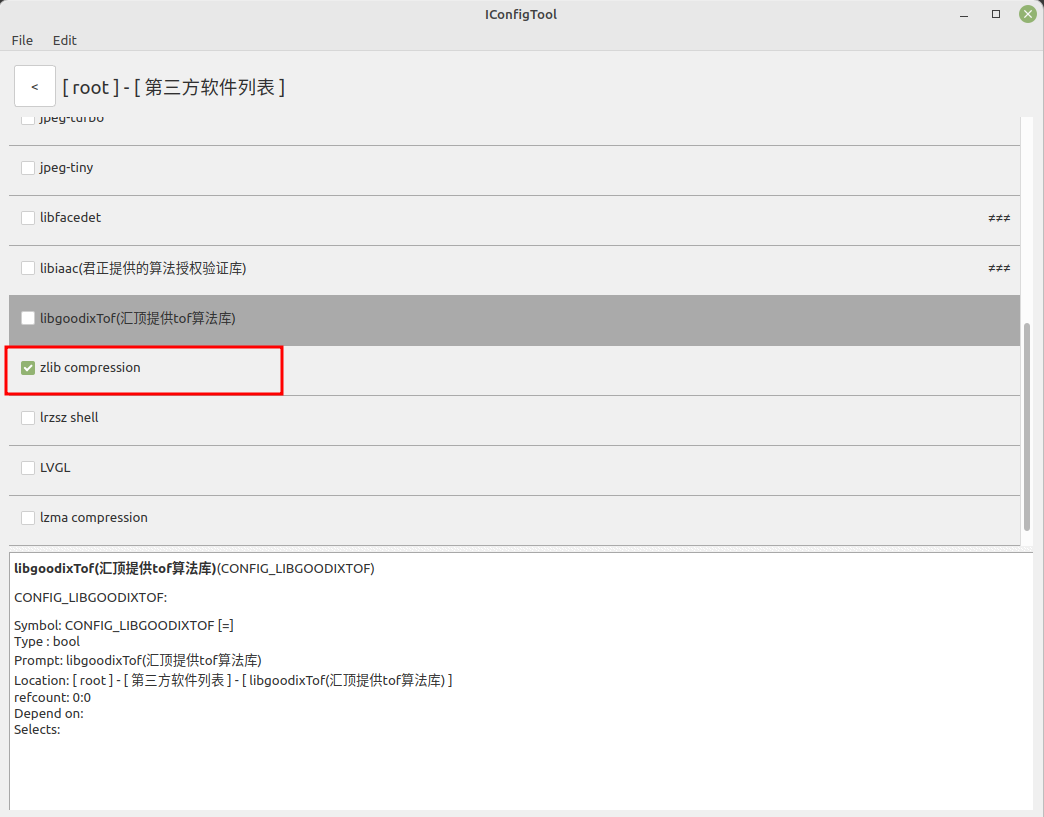
选择zlib compression
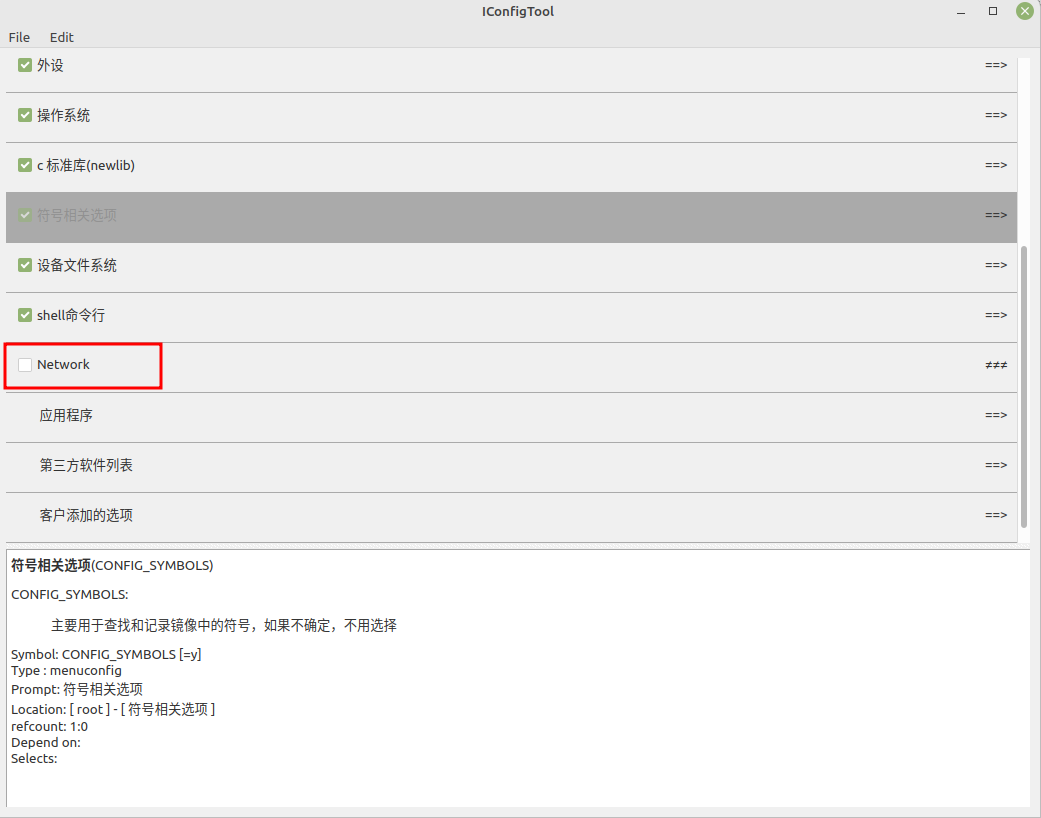
由于PD_X2600_EVB_V2.0开发板没有Network,所以去掉
修改vendor.c内容如下:
kenny@kenny-MS-7B89:~/source/freertos_source/freertos$ cat vendor/vendor.c
#include <stdio.h>
#include "../example/driver/quick_boot_logo_and_load_uimage_example.c"
void vendor_init(void *arg)
{
    printf("vendor init...\n");
    quick_boot_logo_and_load_kernel(arg);
}
修改 freertos$ ls example/driver/quick_boot_logo_and_load_uimage_example.c ,因为PD_X2600_EVB_V2.0开发板没有lcd显示,所以去掉lcd相关的代码逻辑。
kenny@kenny-MS-7B89:~/source/freertos_source/freertos$ cat example/driver/quick_boot_logo_and_load_uimage_example.c
#include <stdio.h>
#include <string.h>
#include <stdlib.h>
#include <common.h>
#include <os.h>
#include <driver/cache.h>
#include <driver/scboot.h>
#include <uboot_lib.h>
#include <be_byteshift.h>

//添加该宏,表示会验签文件系统rootfs,如果不需要验签rootfs,就不需要定义这个宏
#define CONFIG_SECURE_ROOTFS
编译rtos系统
kenny@kenny-MS-7B89:~/source/freertos_source/freertos$ source build/envsetup.sh;make x2600e_nand_defconfig;make
三 签名和加密
注:本文档描述的功能只适用于 cloner-2.5.47-ubuntu_alpha/windows_alpha 以上的烧录工具
x1600、x2000、x2600使用的工具一样,都在securitytool/x2000目录下
3.1 生成秘钥
生成秘钥的工具在烧录工具目录的 securitytool/x2000/keytool/ 下:
kenny@kenny-MS-7B89:~/source/linux_ad100_source/jp/cloner-2.5.47-ubuntu_alpha/securitytool/x2000/keytool$ ls
keygen-32  keygen-64  qm_cn.qm
其中 keygen-32 对于 32 位 pc,keygen-64 对应 64 位 pc
运行:sudo./keygen-64
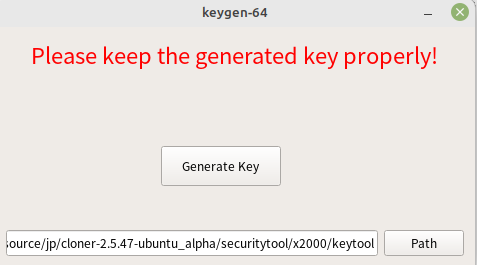
点击 Generate Key 后就会在当前路径下生成秘钥,也可以点击 Path 选择生成的路径。
如下会生成 key.bin,pri_key.pem ,user_key.bin
kenny@kenny-MS-7B89:~/source/linux_ad100_source/jp/cloner-2.5.47-ubuntu_alpha/securitytool/x2000/keytool$ ls
keygen-32  keygen-64 key.bin pri_key.pem user_key.bin qm_cn.qm
将秘钥拷贝到烧录工具的对应位置
-
将 key.bin 拷贝到烧录工具
security/x2000/下:kenny@kenny-MS-7B89:~/source/linux_ad100_source/jp/cloner-2.5.47-ubuntu_alpha/securitytool/x2000/keytool$ cp key.bin ../../../security/x2000/ -arf将 pri_key.pem 和 user_key.bin 拷贝到烧录工具的
securitytool/x2000/sigtool/security_key下:kenny@kenny-MS-7B89:~/source/linux_ad100_source/jp/cloner-2.5.47-ubuntu_alpha/securitytool/x2000/keytool$ cp pri_key.pem ../sigtool/security_key/ -arf
kenny@kenny-MS-7B89:~/source/linux_ad100_source/jp/cloner-2.5.47-ubuntu_alpha/securitytool/x2000/keytool$ cp user_key.bin .../sigtool/security_key/ -arf
3.2 签名和加密的工具
签名工具在烧录工具目录的 securitytool/x2000/sigtool/ 下:
kenny@kenny-MS-7B89:~/source/linux_ad100_source/jp/cloner-2.5.47-ubuntu_alpha/securitytool/x2000/sigtool$ ls
rsa.txt  security_key  setting.ini  settings.ini  sigtool-32  sigtool-64  sigtool.exe
其中 sigtool-32、sigtool-64、sigtool.exe 为对应 pc 下使用的工具
创建文件settings.ini , 写入内容
[debug]
value=1
运行:sudo ./sigtool-64
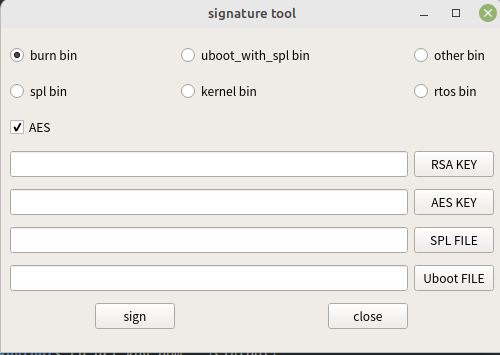
其中 AES 选上为启用加密功能,不选为只签名。
3.3 签名和加密
在对镜像进⾏加密之前, 先烧录⼀次未加密过的镜像, 待spl能加载kernel, kernel挂载⽂件系统, ⽂件系统起来后,确定镜像可⽤即可进⾏签名镜像操作
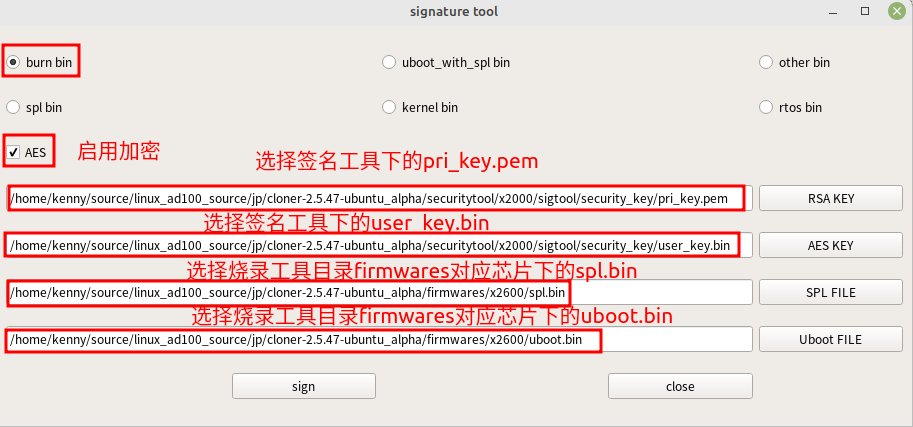
3.3.1 burn bin (烧录工具固件加密)
3.3.2 spl bin
操作如图:
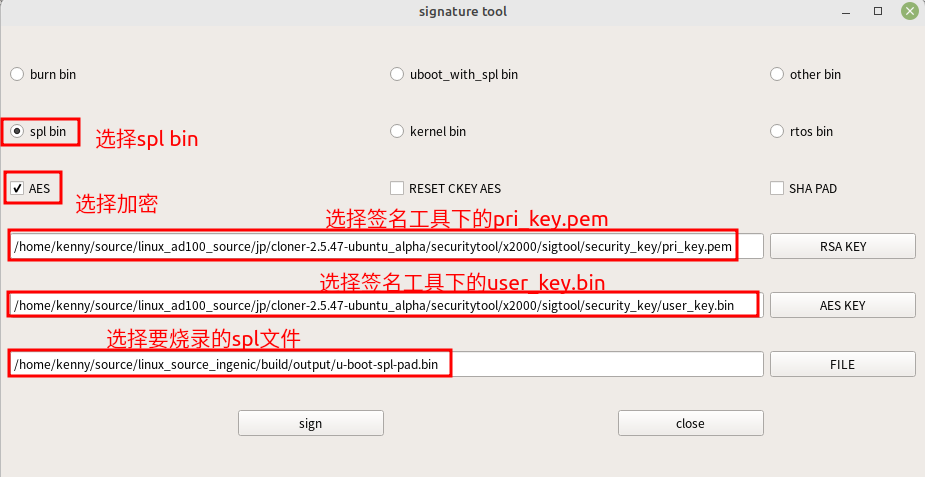
选择好后点击 sign,就会在对应的目录下生成加密后的文件,对于上面的文件就会生成 u-boot-spl-pad-dst.bin,等会烧录 spl 时要选择这个文件
3.3.2 kernel bin
操作如图:
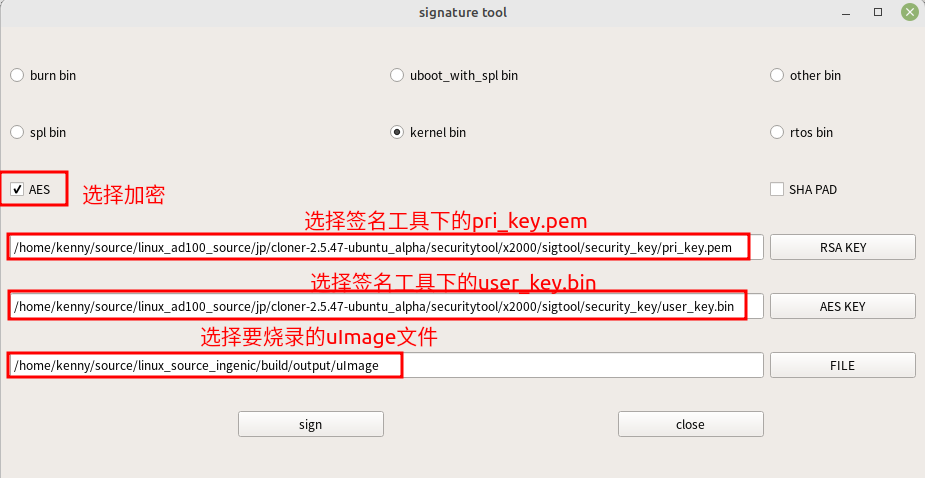
选择好后点击 sign,就会在对应的目录下生成加密后的文件,对于上面的文件就会生成 uImage-dst.bin
3.3.3 rootfs
对于 rootfs ,采用不加密,只签名. 具体操作如下:
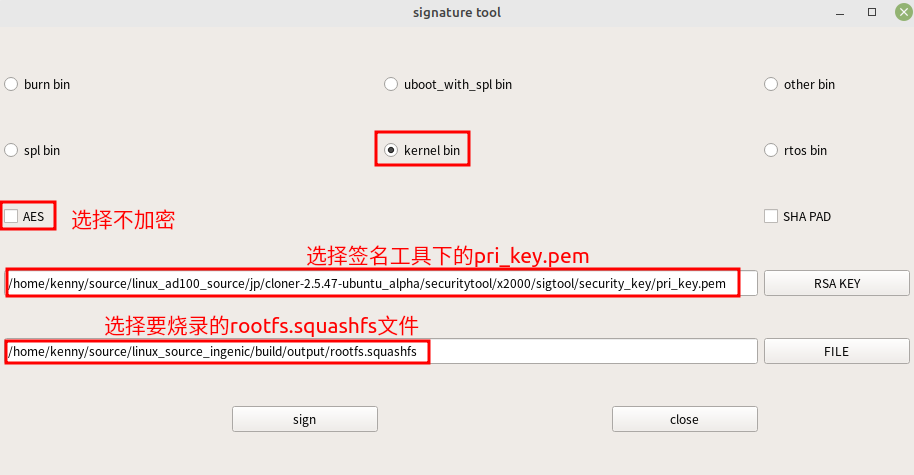
选择好后点击 sign,就会在对应的目录下生成加密后的文件,对于上面的文件就会生成 rootfs-dst.squashfs,然后使用 dd 命令分离出签名信息(等会需要将该签名信息烧录到 flash 中):
dd if=rootfs-dst.squashfs of=signature bs=2048 count=1
如图,signature 就是签名信息,等会需要烧录这个文件:
kenny@kenny-MS-7B89:~/source/linux_source_ingenic/build/output$ dd if=rootfs-dst.squashfs of=signature bs=2048 count=1
记录了1+0 的读入
记录了1+0 的写出
2048字节(2.0 kB,2.0 KiB)已复制,0.000144619 s,14.2 MB/s
kenny@kenny-MS-7B89:~/source/linux_source_ingenic/build/output$ ls
rootfs-dst.squashfs  rootfs.squashfs  signature  u-boot-spl-pad.bin  u-boot-spl-pad-dst.bin  uImage  uImage-dst.bin
对uImage-dst.bin 和 文件系统的签名信息进行合并,方便验签文件系统

cat uImage-dst.bin signature > uImage-dst-with-rootfs-sig.bin
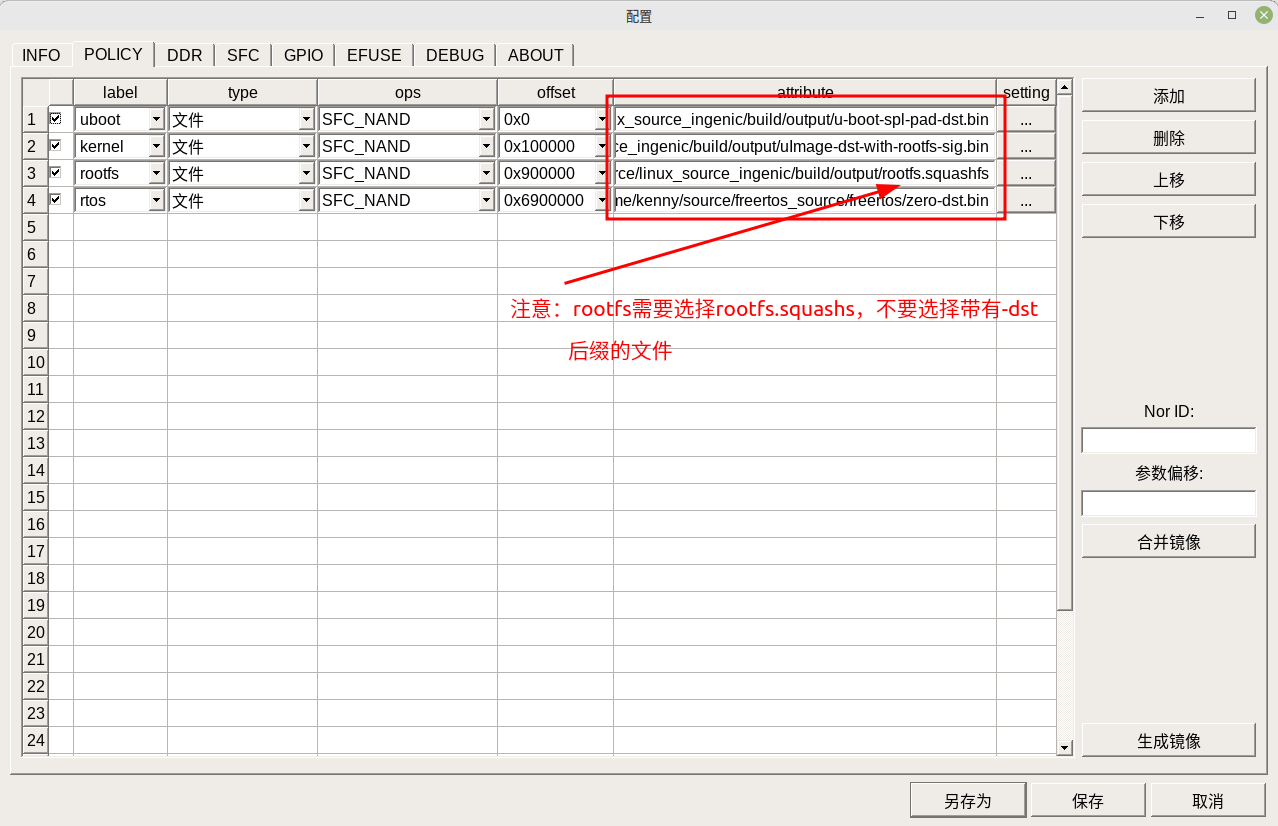
到时烧录工具烧录的时候,选择uImage-dst-with-rootfs-sig.bin,到时烧录工具烧录kernel选择这个文件
3.3.4 rtos bin
操作如下:
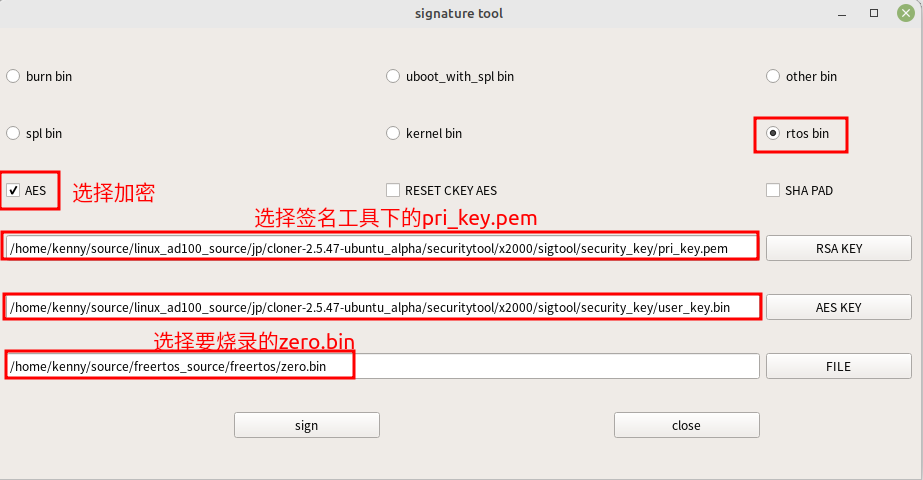
选择好后点击 sign,就会在对应的目录下生成加密后的文件,对于上面的文件就会生成 zero-dst.bin,等会烧录 rtos 时要选择这个文件
四 烧录
本文档使用 cloner-2.5.47-ubuntu_alpha 烧录工具:
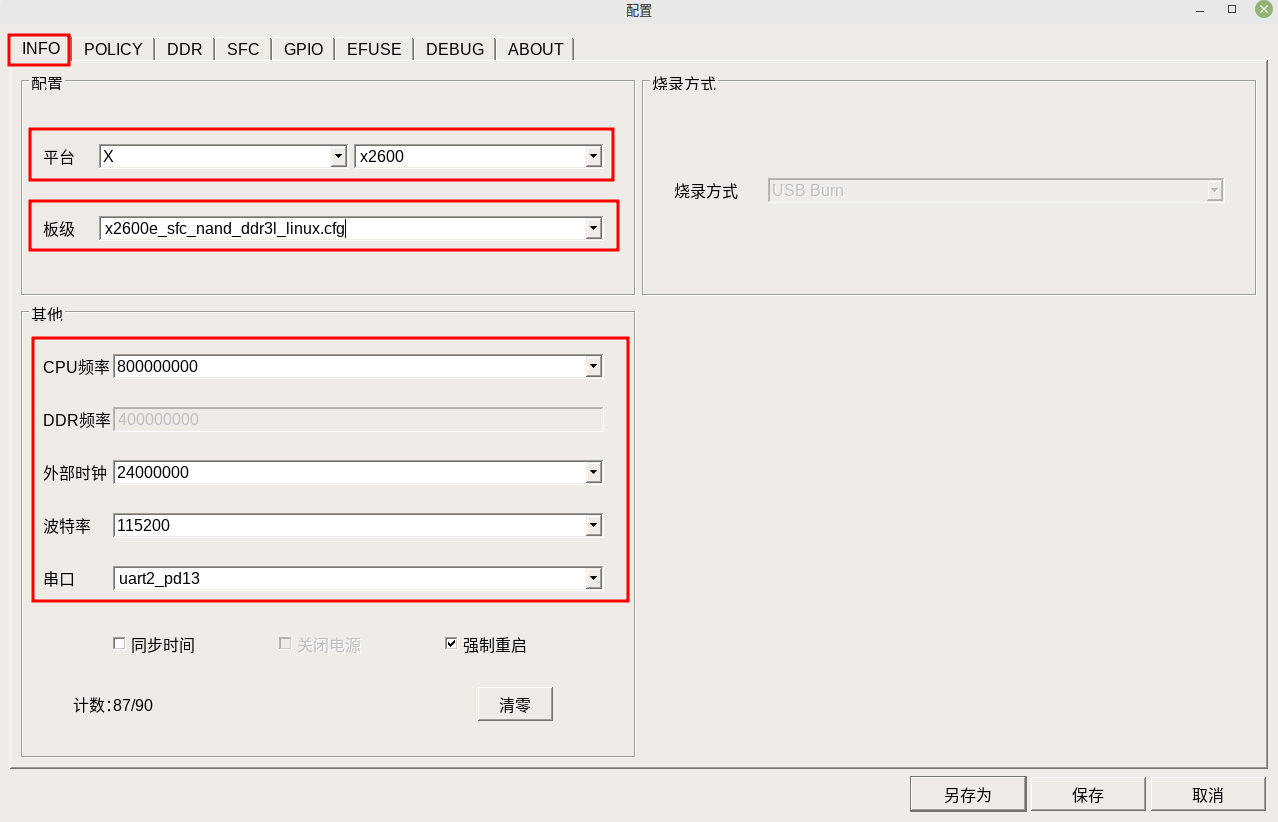
4.1 选择配置文件
4.2 分区配置
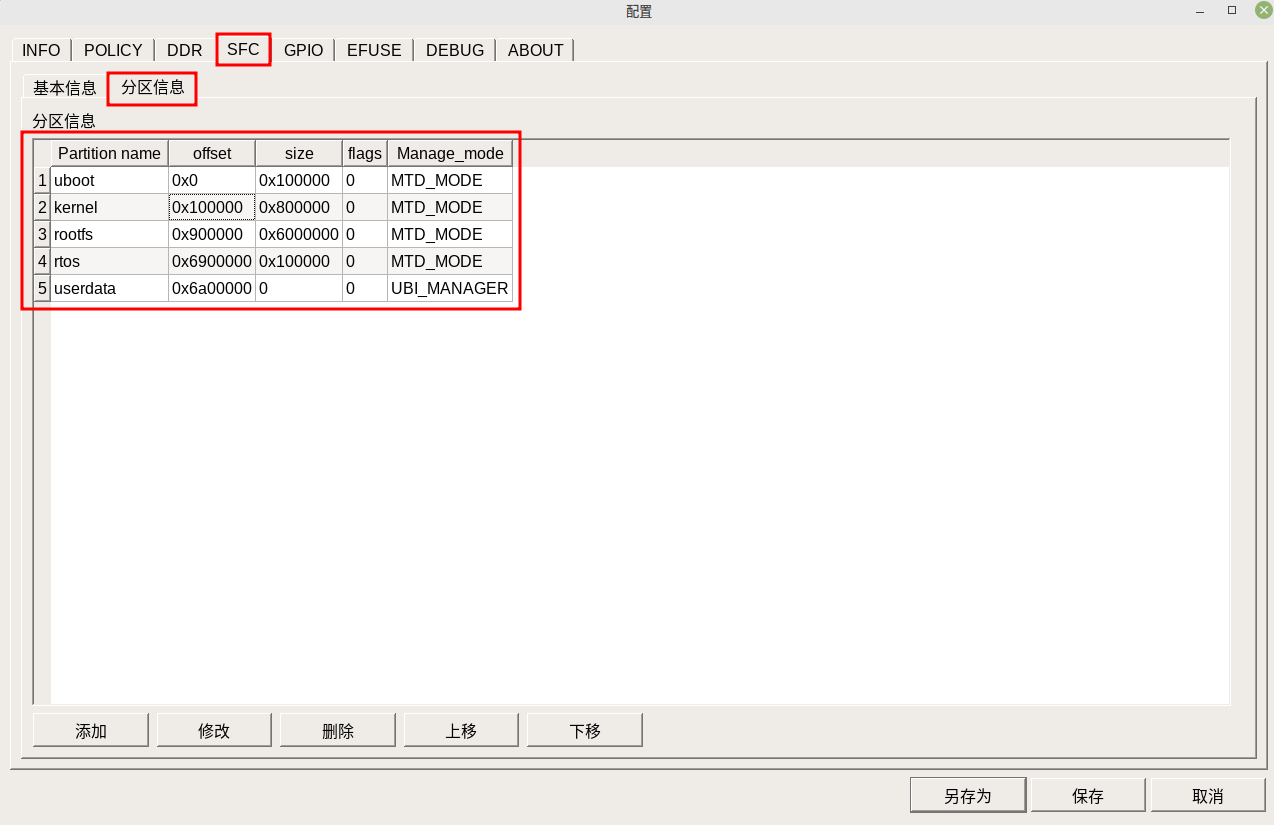
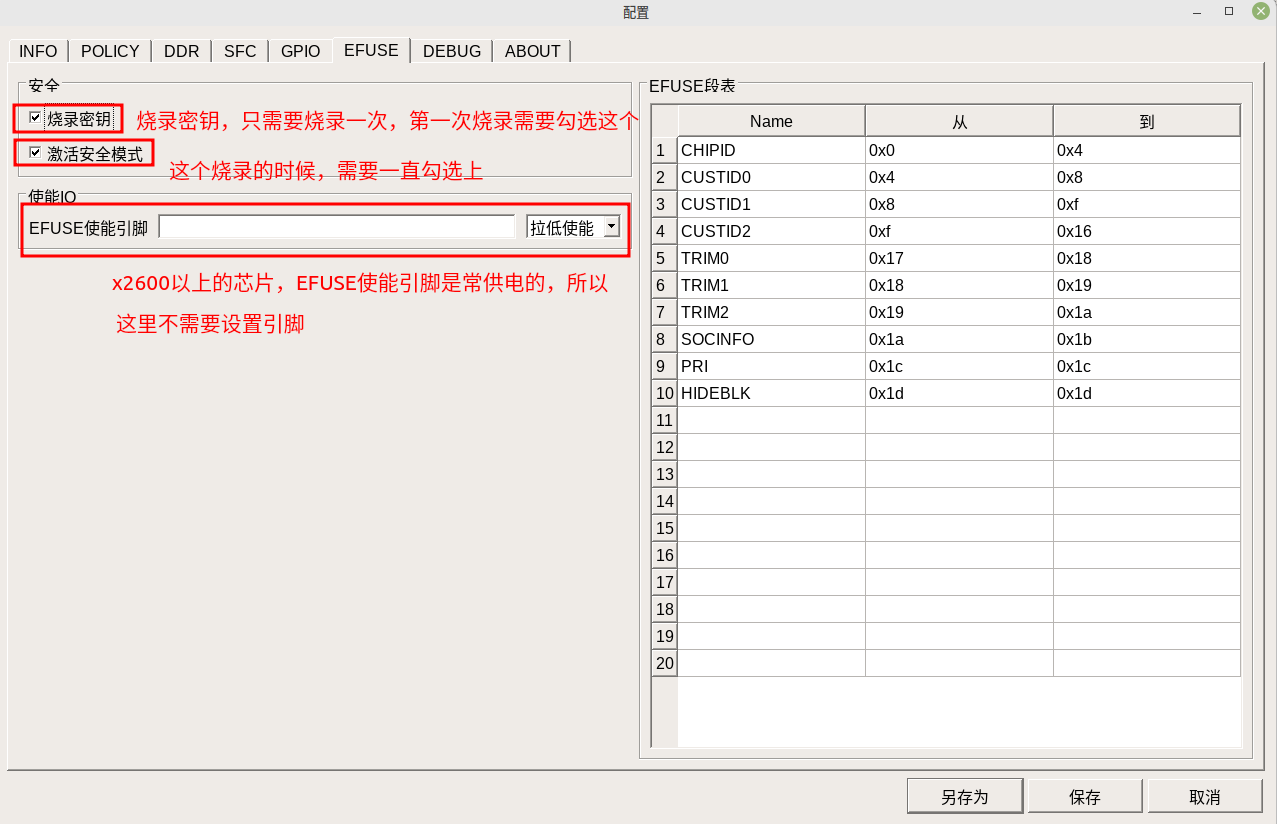
4.3 启用安全烧录
4.4 选择烧录文件
五 问题汇总
1. 烧录到boot 40%变红
可能是cpu烧坏了, 需要重新更换cpu.
efuse烧录有严格的供电要求, 写⼊efuse时, 给efuse的供电时间不能超过200ms, ⼀旦超过200ms就会烧坏efuse, 导致整个芯⽚不能正常使⽤, 此时就需要更换主控芯⽚了
2 烧录到boot 90% SEND KU ERR 变红
直接表现是烧录⼯具烧录之前解码固件失败, 根本原因应该是efuse因为某些原因没有写⼊成功.
此时应当检查efuse的供电及使能电平, 确保硬件设计和烧录⼯具设置的⼀致. 排除此处原因后, 重新烧录可以成功的.
3 换其他烧录⼯具烧录后系统⽆法启动
由于efuse中数据位跳变是不可逆的, 所以⼀定要保证⽤此加密烧录后的系统再次更新还是使⽤同样的烧录⼯具和密钥来完成的. 如果使⽤新的烧录⼯具烧录了其他的密钥, 那么再⽤原先的烧录⼯具也⽆法再次烧录正确的密钥了, 引起系统可能再也启动不了了. 到此步, 只能更换主控芯⽚才能再次使⽤了.
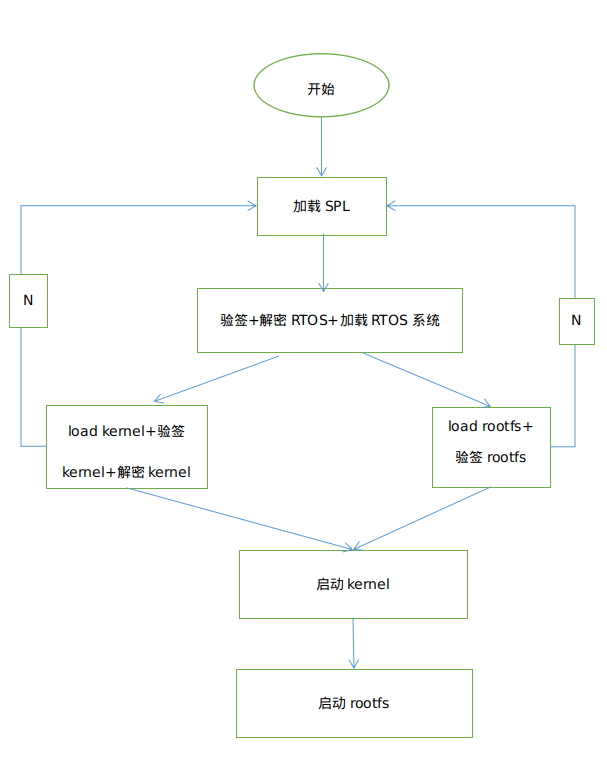
六 系统解密流程
对应log
U-Boot SPL 2013.07-00209-g51a7efe20-dirty (Aug 09 2024 - 16:04:47)
ERROR EPC 80018098
CPA_CPAPCR:0300490d
CPM_CPMPCR:04b0490d
CPM_CPEPCR:0190510d
CPM_CPCCR:9a0b5410
DDR: W632GU6QG-11 type is : DDR3
451, VID=0x0000009b, PID=0x00000012
Security boot...  //验签和解密rtos文件系统
[0.000000] xburst2 rtos @ Aug  9 2024 15:41:03, epc: 80018098
[0.000146] gpio: VDDIO_CIM(PA00~PA11) = 3.3V
[0.000338] gpio: VDDIO_SD(PD00~PD05) = 3.3V
[0.000557] Supported Nand Flash, ATO25D1GA(9b:12)
[0.035221] vendor init...
[0.252670] image size = 3835168, load addr = 8000ffc0
[0.252867] Security boot... //验签kernel+解密kernel
[0.927110] Security boot... //验签文件系统
Linux version 5.10.186+ (kenny@kenny-MS-7B89) (mips-linux-gnu-gcc (Ingenic Linux-Release5.1.8-Default_xburst2_glibc2.29 Optimize: jr base on 5.1.6 2023.07-18 08:46:58) 7.2.0, GNU ld (Ingenic Linux-Release5.1.8-Default_xburst2_glibc2.29 Optimize: jr base on 5.1.6 2023.07-18 08:46:58) 2.27) #5 SMP PREEMPT Fri Aug 9 15:52:11 CST 2024
CPU0 RESET ERROR PC:80018098
[<80018098>] 0x80018098
printk: bootconsole [early0] enabled
CPU0 revision is: 00132000 (Ingenic XBurst II)
FPU revision is: 00f32000
MSA revision is: 00002000
OF: fdt: No chosen node found, continuing without
MIPS: machine is ingenic,x2600
[<80018098>] 0x80018098
ingenic-dma 13660000.dma: IRQ pdmam not found
ingenic-dma 13420000.dma: IRQ pdmam not found
s2d successfully!-----0
mount: mounting devpts on /dev/pts failed: No such device
Starting mdev... OK
/
Saving random seed: SKIP (read-only file system detected)
UBI device number 1, total 176 LEBs (22347776 bytes, 21.3 MiB), available 0 LEBs (0 bytes), LEB size 126976 bytes (124.0 KiB)
Starting network: OK
mkdir: can't create directory '/sys/kernel/config/usb_gadget/adb_demo': No such file or directory
/etc/init.d/adb/S440adb: cd: line 18: can't cd to /sys/kernel/config/usb_gadget/adb_demo: No such file or directory
/etc/init.d/adb/S440adb: line 22: can't create idVendor: Read-only file system
/etc/init.d/adb/S440adb: line 23: can't create idProduct: Read-only file system
/etc/init.d/adb/S440adb: line 24: can't create bcdUSB: Read-only file system
/etc/init.d/adb/S440adb: line 25: can't create bcdDevice: Read-only file system
mkdir: can't create directory 'strings/0x409': No such file or directory
/etc/init.d/adb/S440adb: line 30: can't create strings/0x409/manufacturer: nonexistent directory
/etc/init.d/adb/S440adb: line 31: can't create strings/0x409/product: nonexistent directory
mkdir: can't create directory 'configs/c.1': No such file or directory
/etc/init.d/adb/S440adb: line 36: can't create configs/c.1/MaxPower: nonexistent directory
mkdir: can't create directory 'configs/c.1/strings/0x409': No such file or directory
/etc/init.d/adb/S440adb: line 39: can't create configs/c.1/strings/0x409/configuration: nonexistent directory
killall: adbd: no process killed
mkdir: can't create directory 'functions/ffs.adb': No such file or directory
ln: configs/c.1: No such file or directory
/etc/init.d/adb/S440adb: line 63: can't create strings/0x409/serialnumber: nonexistent directory
Starting adb ...

# mount: mounting adb on /dev/usb-ffs/adb failed: No such device

install_listener('tcp:5037','*smartsocket*')
Using USB