AD100 I2C总线
一 功能简介
AD100 I2C由SDA (serial data line) 和SCL (serial clock) 组成
支持三种模式:
- Standard mode (100 Kb/s)
- Fast mode (400 Kb/s)
- High mode (3.4Mb/s)
支持 Master 和 Slave 模式
7/10-bit 地址位
3个独立的I2C通道(I2C0、I2C1、I2C3)
若I2C总线不够用,或者怀疑i2c驱动异常,还可以使用GPIO口模拟I2C
二 硬件I2C配置方法
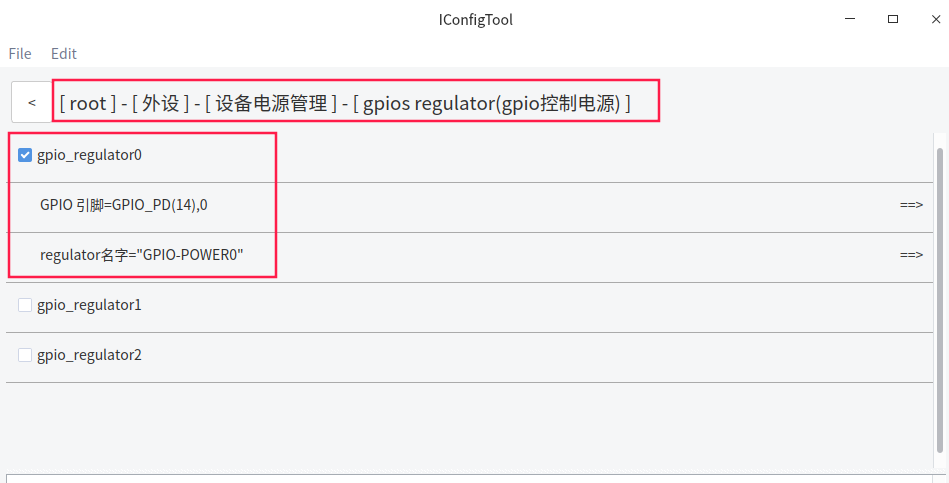
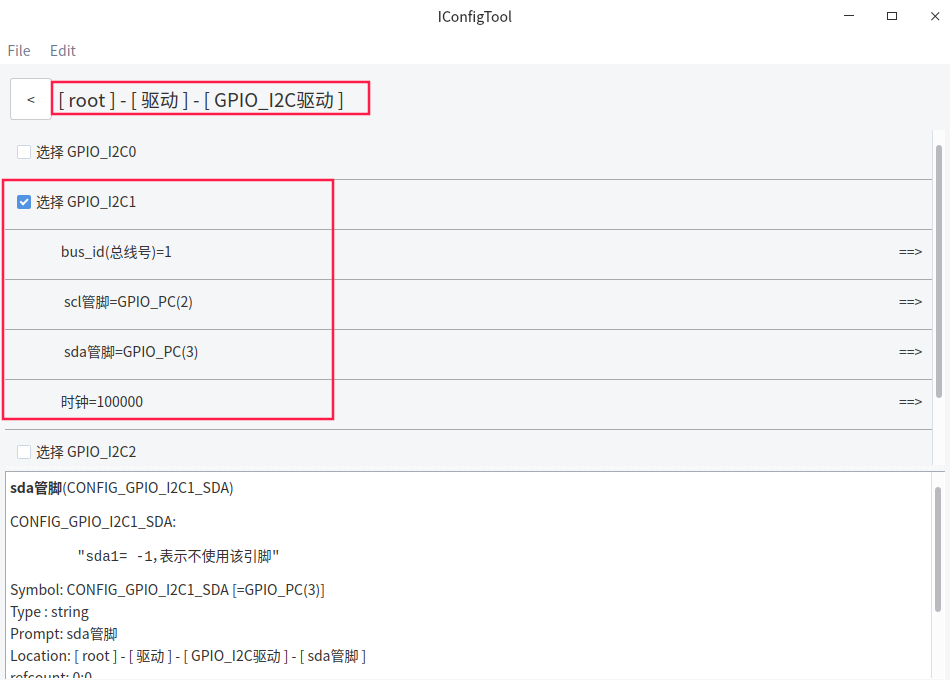
以RD_AD100_EVB_V1.0开发板为例 , 其中tp触摸屏使用到 I2C, 使用ad100_nor_defconfig配置 , 实际根据硬件需要配置
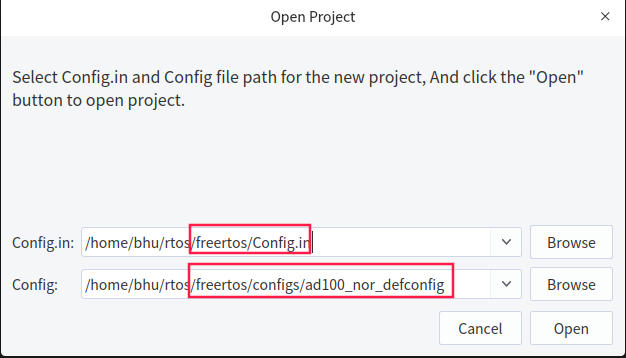
I2C控制器驱动配置
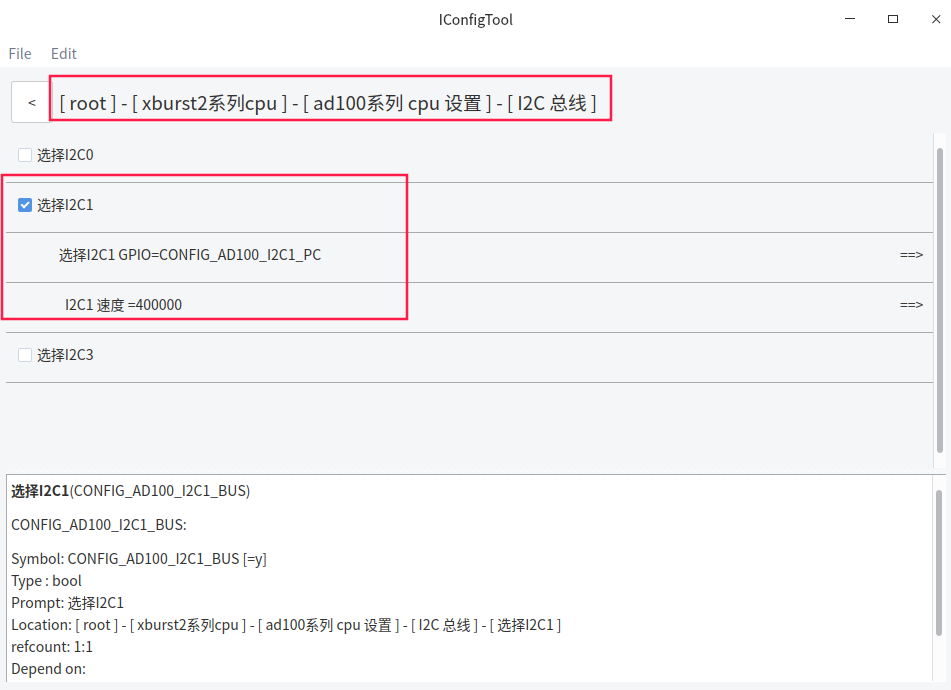
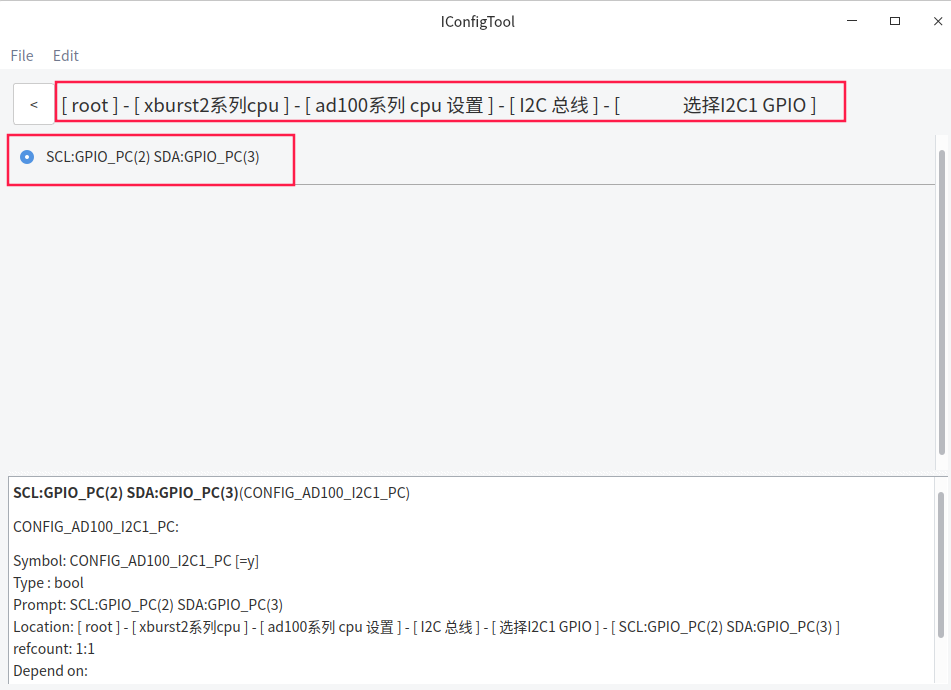
相关GPIO选择
配置的i2c设备为tp, 需要配置下tp
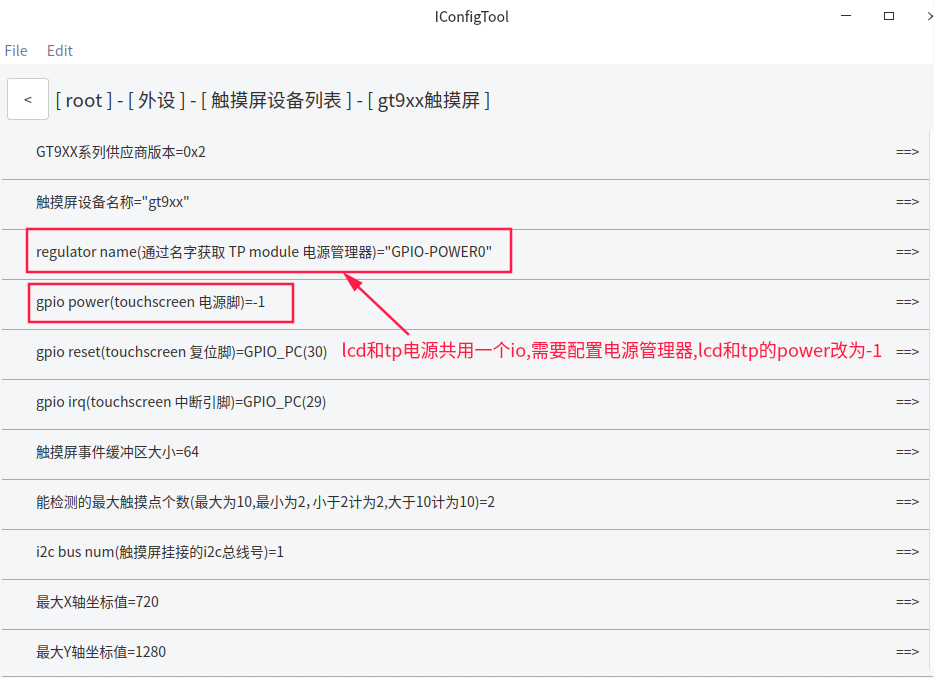
三 GPIO模拟I2C配置方法
四 I2C测试例子
4.1 测试代码
代码位于freertos/example/driver/i2c_example.c
#include <common.h>
#include <driver/i2c.h>
#include <os.h>

/**
 * 具体设备的写函数,需要根据具体的设备去实现
 * i2c: 从设备句柄
 * reg: 从设备具体的寄存器地址
 * buf: 发送缓冲区
 * len: 发送数据的个数
 */
int xx_reg_write(struct i2c_device *i2c, unsigned short reg, char *buf, int len)
{
    char tbuf[128];

    /* 如果需要访问具体的寄存器需要将reg和buf内容进行拼接,将拼接好的内容一起传给i2c_message */
    tbuf[0] = reg;
    if (buf) {
        memcpy((void *)(tbuf+1), (void *)buf, len);
        len++;
    }

    struct i2c_msg m = {
        .buf = tbuf,    /* tbuf为拼接后的内容 */
        .len  = len,      /* 发送数据的个数 */
        .flags = I2C_M_WR,
    };
    return i2c_transfer(i2c, &m, 1);
}

/**
 * 具体设备的读函数,需要根据具体的设备去实现
 * i2c: 从设备句柄
 * reg: 从设备具体的寄存器地址
 * buf: 接收缓冲区
 * len: 接收数据的个数
 */
int xx_reg_read(struct i2c_device *i2c, unsigned short reg, char *buf, int len)
{
    /* i2c 读操作前需要先进行写操作 */
    xx_reg_write(i2c, reg, NULL, 1);

    struct i2c_msg m = {
        .buf = buf,
        .len  = len,
        .flags = I2C_M_RD,/* 发送读操作标志 */
    };
    return i2c_transfer(i2c, &m, 1);
}

void i2c_test(void *data)
{
    int ret = 0;
    char tbuf[1] = {0x12};
    char rbuf[1024] = {0};

    struct i2c_device *i2c = i2c_register(1, 0x5d, I2C_ADDR_BIT_7, "i2c");/* 0x5d是从设备地址 */
    if (i2c == NULL) {
        printf("i2c register error! may be exist the same address on the same bus!\n");
        return;
    }

    /* 具体设备的读写函数需要自己实现,这里只给出简单的示例 */
    ret = xx_reg_write(i2c,0xf0, tbuf, 1);/* 0xf0是i2c外设具体的寄存器地址 */
    if (ret < 0)
        printf("i2c write error %d\n", ret);
    ret = xx_reg_read(i2c, 0xf0, rbuf, 1);
    if (ret < 0)
        printf("i2c write error %d\n", ret);

    printf("i2c: rx_buf = %x\n", rbuf[0]);

    i2c_unregister(i2c);
}

void test_main(void)
{
    thread_create("i2c_test", 2048, i2c_test, NULL);
}
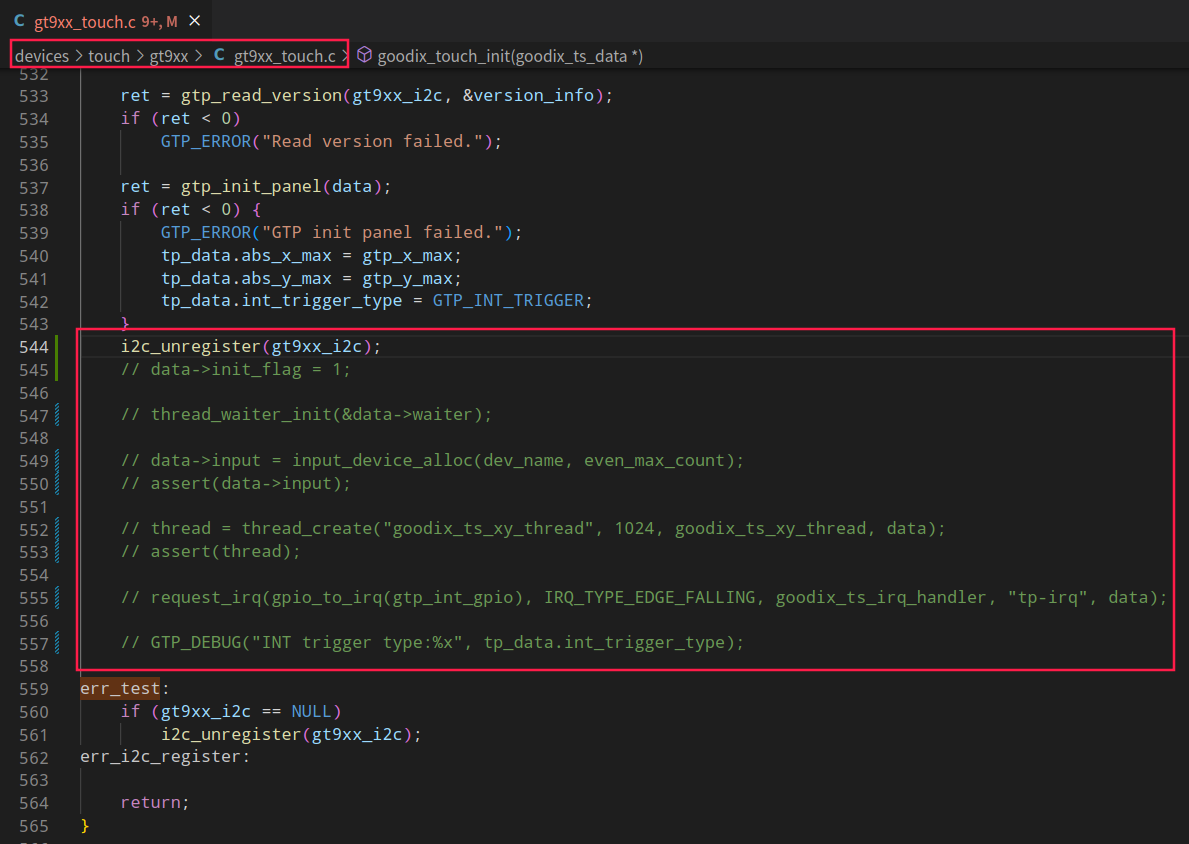
本开发板使用到i2c设备的是tp触摸屏,具体的实现可以看
freertos/devices/touch/gt9xx/gt9xx_touch.c
4.2 测试程序编译和使用
在freertos/vendor目录下添加i2c_example.c, 修改vendor.c, 以RD_AD100_EVB_V1.0开发板为例,测试触摸屏.
#include <stdio.h>
#include "i2c_example.c"
#include <driver/gpio.h>
#include <common.h>
#include <devices/gt9xx_touch.h>
void vendor_init(void *arg)
{
    struct goodix_ts_data goodix;
    goodix_touch_init(&goodix);
    printf("vendor init...\n");
    i2c_test(0);

}
goodix_touch_init需要先释放I2C
五 编译和烧录
bhu@bhu-PC:~/rtos$ cd freertos
bhu@bhu-PC:~/rtos/freertos$ make ad100_nor_defconfig
bhu@bhu-PC:~/rtos/freertos$ make
bhu@bhu-PC:~/rtos/freertos$ ls rtos-with-spl.bin
rtos-with-spl.bin                                           //编译出来的文件
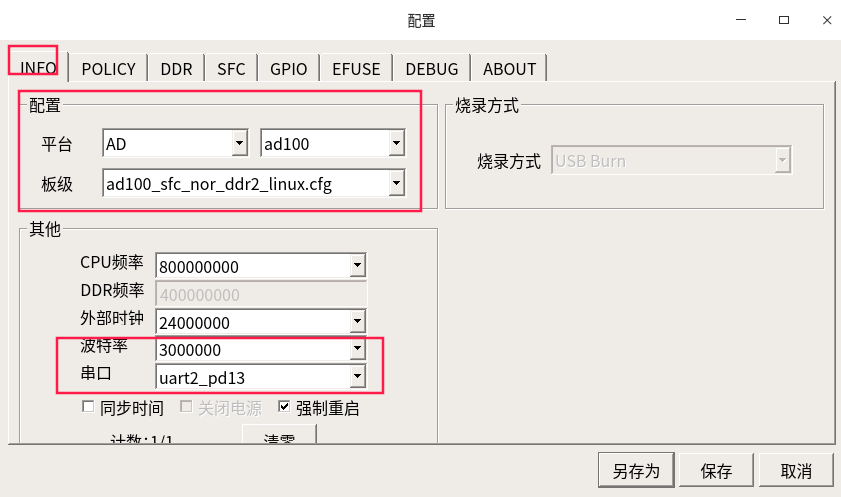
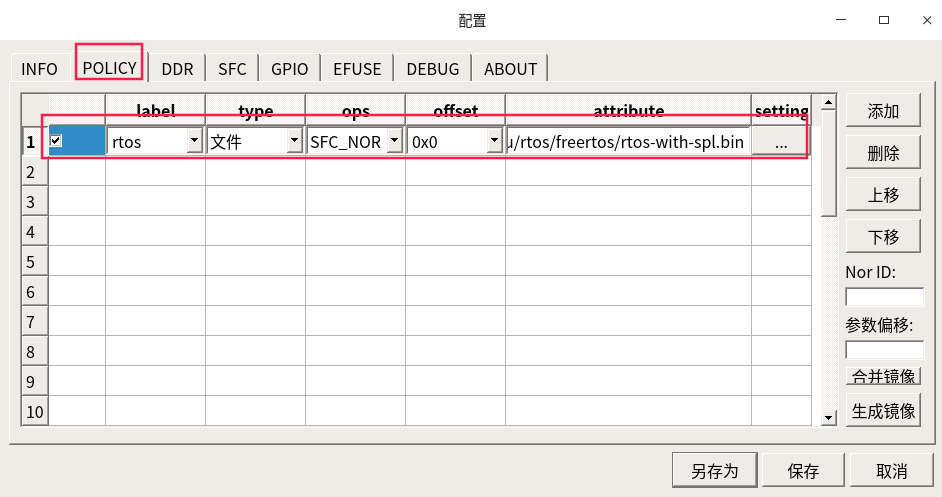
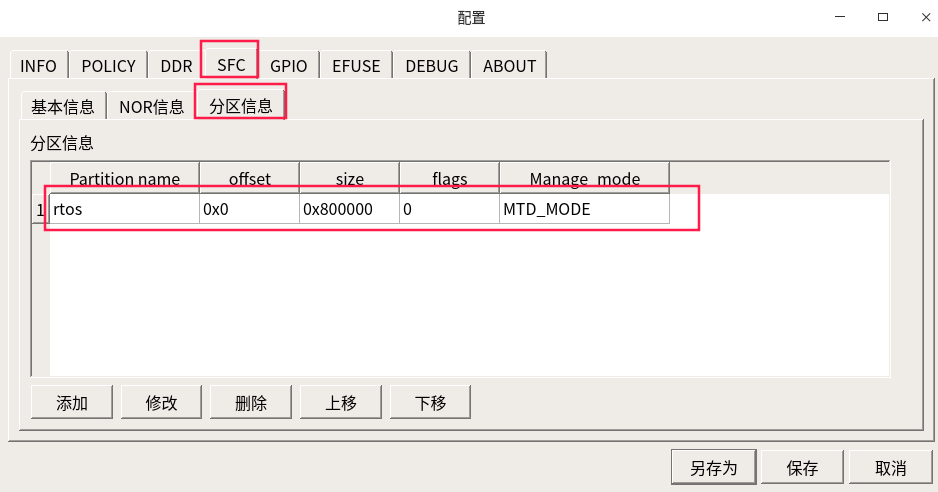
请使用最新版烧录工具
烧录配置
六 测试验证
测试i2c设备检测及写入读取(相关参数说明见九I2C shell命令详解)
$ i2c_detect 1                 //i2c设备检测
     0  1  2  3  4  5  6  7  8  9  a  b  c  d  e  f
00: -- -- -- -- -- -- -- -- -- -- -- -- -- -- -- --
10: -- -- -- -- -- -- -- -- -- -- -- -- -- -- -- --
20: -- -- -- -- -- -- -- -- -- -- -- -- -- -- -- --
30: -- -- -- -- -- -- -- -- -- -- -- -- -- -- -- --
40: -- -- -- -- -- -- -- -- -- -- -- -- -- -- -- --
50: -- -- -- -- -- -- -- -- -- -- -- -- -- 5d -- --
60: -- -- -- -- -- -- -- -- -- -- -- -- -- -- -- --
70: -- -- -- -- -- -- -- -- -- -- -- -- -- -- -- --
$ i2c_write 1 0x5d 0x11 0x22 0x33       //i2c设备写入
i2c cmd to Slave device write success
$ i2c_read 1 0x5d 2       //i2c设备读取
i2c cmd to Slave device read success
Data 0: 0x0
Data 1: 0x0
七 硬件I2C 应用接口分析
相关源码见freertos/drivers目录下的i2c.c
包含头文件:
#include <driver/i2c.h>
i2c使用流程:
1.i2c_init //函数初始化I2C
2.i2c_register //注册I2C
3.i2c_transfer //函数进⾏I2C数据传输
4.i2c_unregister //释放I2C
api详解:
struct i2c_device *i2c_register(int i2c_bus_num, unsigned short addr, enum i2c_addr_type addr_bit, char *name)
功能: 注册I2C设备
参数: int i2c_bus_num // I2C总线编号
      unsigned short addr // I2C从设备地址
      enum i2c_addr_type addr_bit // I2C从设备地址类型
      char *name // I2C设备名 (仅作为标识)
返回值:struct i2c_device // 从设备句柄
int i2c_transfer(struct i2c_device *dev, struct i2c_msg *msg, int count)
功能:I2C数据传输
参数: struct i2c_device *dev // 从设备句柄 (I2C注册函数返回值)
      struct i2c_msg *msg // 传输数据的信息
      int count // 传输数据的数量
返回值:  ⼤于0 // 传输数据的数量
        -ENXIO(-6) // 没有发现从设备地址和设备
        -ETIMEDOUT(-110) // 连接超时
"注意:函数运⾏时会阻塞,在线程上下⽂使⽤的时候会引起任务调度,在中断上下⽂使⽤时会轮询阻塞。"
int i2c_detect_device(struct i2c_device *dev)
功能:检测I2C从设备地址
形参:struct i2c_device *dev // 从设备句柄(I2C注册函数返回值)
返回值: 0 // 检测器件地址成功(i2c->addr)
       -ETIMEDOUT(-110) // 连接超时
void i2c_unregister(struct i2c_device *dev)
功能: 释放I2C资源
形参: struct i2c_device *dev // 从设备句柄(I2C注册函数返回值)
中间参数详解:
I2C从设备句柄:
struct i2c_device {
    int bus_num; // I2C总线编号
    char *name; // I2C设备名 (仅作为标识)
    enum i2c_addr_type addr_bit; // I2C器件地址类型
    unsigned short addr; // I2C从设备地址
    struct i2c_bus *i2c_bus; // I2C总线
    struct list_head link; // 已注册设备链表节 点
};

I2C从设备器件地址⻓度:
enum i2c_addr_type {
    I2C_ADDR_BIT_7, // 7位器件地址
    I2C_ADDR_BIT_10, // 10位器件地址
};

I2C传输相关信息结构体:
struct i2c_msg {
    int len; // 数据传输的个数
    void *buf; // 数据缓 冲区
    int flags;
    /*
    * flags 传输标识.有以下选择:
    * I2C_M_TEN : 选择 10bit 地址
    * I2C_M_RD : 发送读操作命令
    * I2C_M_RW : 发送写操作命令
    * I2C_M_NOSTART :当flags没有此标志位时开始传输第⼀个msg 时发送start信号
    * 之后每个 msg都发送start信号最后传输结束发送stop信号。
    * NOTE: 以上传输标识可组合使⽤(使⽤或运算)
    */
};
八 GPIO_I2C 应用接口分析
相关源码见freertos/drivers目录下的gpio_i2c.c
包含头文件:
#include <driver/gpio_i2c.h>
i2c使用流程:
在调⽤注册函数前可以先调⽤i2c_gpio_add_bus 函数添加总线

在调⽤注销后调⽤i2c_gpio_remove_bus函数删除总线
api详解:
struct i2c_bus* gpio_i2c_add_bus(struct gpio_i2c_bus_data *i2c);
功能:向总线链表添加总线节点
参数:struct gpio_i2c_bus_data *i2c //总线数据,数据内容可由⽤⼾输⼊
返回值:总线信息结构体
void gpio_i2c_remove_bus(struct i2c_bus *bus);
功能:移除总线链表中的总线节点
参数:struct i2c_bus *bus //总线信息
返回值:⽆
"注意:其他注册传输注销api请参考适配器i2c函数,这些函数与适配器共⽤同⼀个接⼝。"
中间参数详解
gpio_i2c总线数据结构体:
struct gpio_i2c_bus_data {
    int i2c_bus_id; //总线编号
    int gpio_scl; //scl时钟线引脚
    int gpio_sda; //sda数据线引脚
    unsigned int clk_rate; //时钟频率
};
" 注意:其他结构体参数请参考i2c中间参数详解."
九 I2C shell命令详解
相关源码见freertos/shell/cmds/drivers目录下的cmds_i2c.c
9.1 shell命令
i2c_write <bus_num> <dev_addr> <data0> [data....]
功能:向设备写⼊数据
参数:bus_num //i2c总线(单位:10进制)
     dev_addr //设备地址(单位:16进制)
     <data0> [data....] //数据(单位:16进制)
Example:
        i2c_write 0 0x40 0x11 0x22 0x33
i2c_read <bus_num> <dev_addr> <size>
功能:读取设备数据
参数:bus_num //i2c总线(单位:10进制)
     dev_addr //设备地址(单位:16进制)
     size //读取数据的⼤⼩(单位:10进制)
Example:
        i2c_read 0 0x40 2
i2c_write_reg <bus_num> <dev_addr> <reg_addr> <data0> [data....]
功能:向寄存器写⼊数据
参数:bus_num //i2c总线(单位:10进制)
     dev_addr //设备地址(单位:16进制)
     reg_addr //从设备地址(单位:16进制)
     <data0> [data....] //数据(单位:16进制)
Example:
        i2c_write_reg 0 0x40 0xf0 0x11 0x22 0x33
i2c_read_reg <bus_num> <dev_addr> <reg_addr> <size>
功能:读取寄存器数据
参数:bus_num //i2c总线(单位:10进制)
     dev_addr //设备地址(单位:16进制)
     reg_addr //从设备地址(单位:16进制)
     size //读取数据的⼤⼩(单位:10进制)
Example:
        i2c_read_reg 0 0x40 0xf0 2
i2c_detect <bus_num>
功能:检测该总线的设备
参数:bus_num //i2c总线(单位:10进制)
Example:
        i2c_detect 0
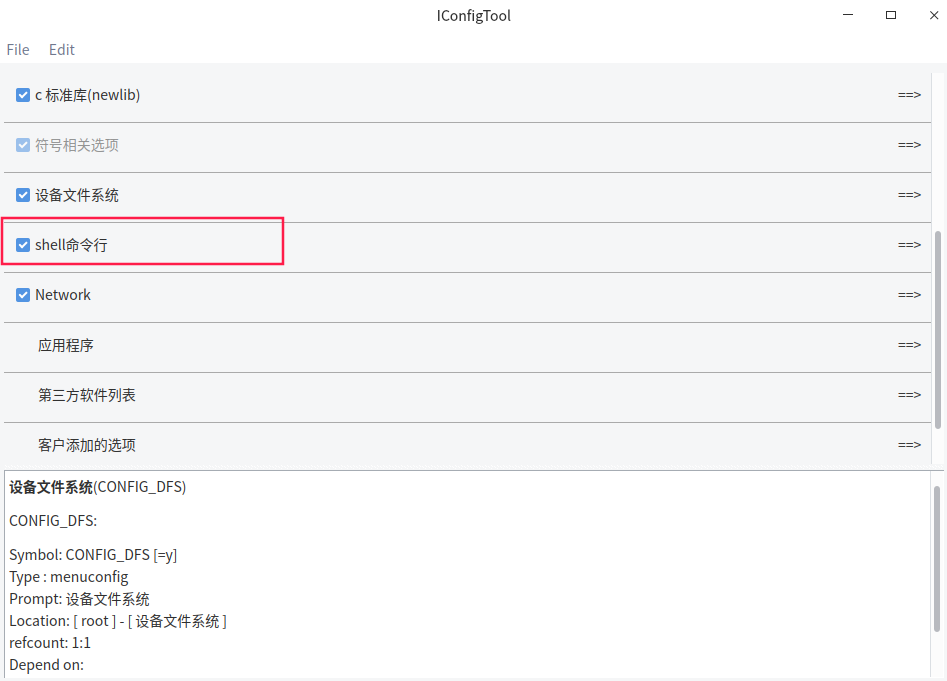
9.2 shell配置
9.3 具体例⼦
$ i2c_detect 1
     0  1  2  3  4  5  6  7  8  9  a  b  c  d  e  f
00: -- -- -- -- -- -- -- -- -- -- -- -- -- -- -- --
10: -- -- -- -- -- -- -- -- -- -- -- -- -- -- -- --
20: -- -- -- -- -- -- -- -- -- -- -- -- -- -- -- --
30: -- -- -- -- -- -- -- -- -- -- -- -- -- -- -- --
40: -- -- -- -- -- -- -- -- -- -- -- -- -- -- -- --
50: -- -- -- -- -- -- -- -- -- -- -- -- -- 5d -- --
60: -- -- -- -- -- -- -- -- -- -- -- -- -- -- -- --
70: -- -- -- -- -- -- -- -- -- -- -- -- -- -- -- --